안녕하세요. 이 글은 5주차에 진행한 postgredsql operator를 다룹니다.
1. postgresql 간단한 소개
postgresql의 키워드는 라이센스에 자유로운 RDMS입니다. 트랜잭션, 인덱싱 등 데이터베이스 기능과 클러스터 등 안정성을 위한 구조도 가지고 있습니다.
2. CloudNatviePG postgresql operator 간단한 소개
링크:https://cloudnative-pg.io/documentation/1.15.1/
스터디에서 선택한 postgresql operator는 CloudNatviePG입니다. CloudNativePG는 아파치 2.0 라이센스를 가지고 있고 2022년 CNCF에 등록되었습니다.
2.1 클러스터 DB인스턴스 역할
공식문서에서 소개된 것처럼 postgresql DB인스턴스는 3가지 역할이 있습니다.
- rw: 쓰기를 위한 primary DB인스턴스 접근
- r: 읽기를 위한 아무 DB인스턴스 접근
- ro: 읽기를 위한 standby DB인스턴스 접근
rw은 읽기/쓰기가 가능한 역할로 Primary 인스턴스에 수행합니다. 애플리케이션은 Primary 인스턴스에 접근하기 위해 Primary 쿠버네티스 서비스로 접근해야 합니다.
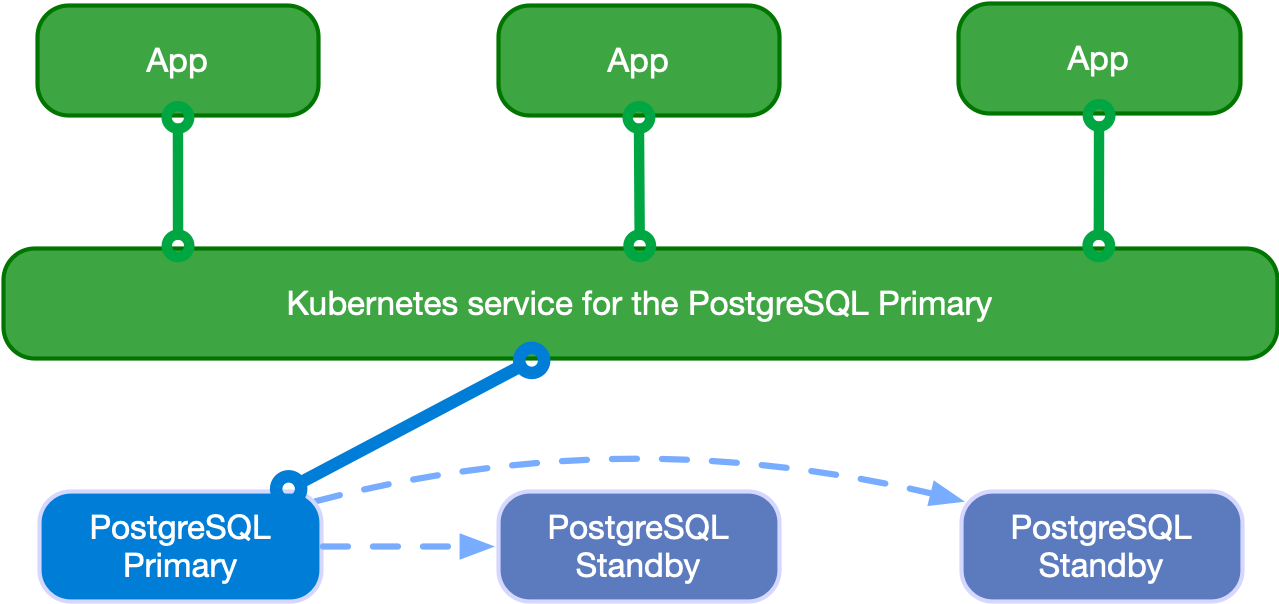
ro역할은 데이터베이스 데이터를 읽기만 가능합니다. Standby 인스턴스가 ro역할을 수행합니다.

2.2 데이터베이스 상태 관리
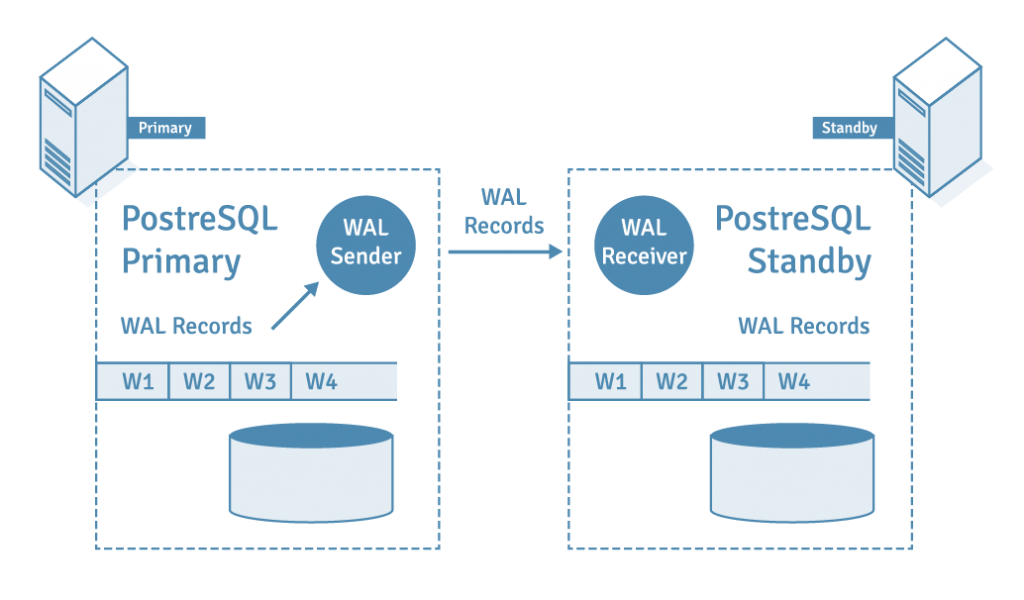
postgresql은 상태는 WAL(Write Ahead Log)방식을 적용합니다. 데이터베이스에 변경되는 작업을 먼저 파일에 기록한 후에, 파일에 저장된 기록을 실행하는 방법입니다. WAL파일의 장점은 데이터베이스가 장애가 나더라도 수행할 작업이 파일에 기록되기 때문에 신뢰성을 보장할 수 있습니다.
2.3 Standby 인스턴스 데이터 복제 원리
Primary 인스턴스에 존재하는 WAL파일을 Standby 인스턴스에 복제 후, 쿼리를 실행함으로써 데이터 동기화를 수행합니다. 복제 방법에 따라 동기, 비동기 방법을 지원합니다.
2.4 cnpg 플러그인 지원
krew 플러그인 목록: https://krew.sigs.k8s.io/plugins/
cnpg플러그인이 완벽호환되어서 오퍼레이터 상태 조회 등을 쉽게 할 수 있습니다. cpng플러그인은 krew로 설치할 수 있습니다.
3. operator 설치
helm차트 설치문서: https://cloudnative-pg.io/documentation/1.15.1/installation_upgrade/
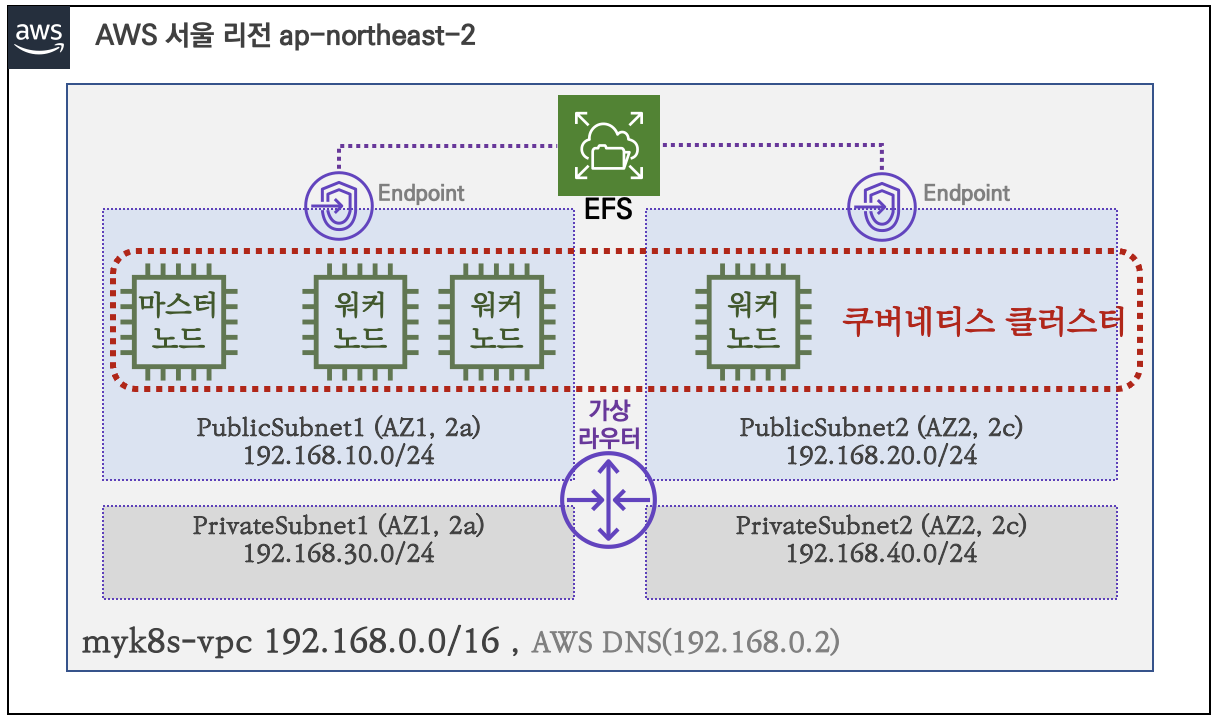
쿠버네티스 리소스 또는 helm으로 설치할 수 있습니다. 저는 helm을 이용하여 설치했습니다. 인프라는 aws를 사용했고 스터디에서 제공하는 cloudformation을 이용하여 설치를 자동화했습니다.
helm설치는 간단합니다. helm차트를 추가하고 cloudnative-pg차트를 설치하면 됩니다. 아래 예제에서는 nodelselector를 적용하기 위해 value를 오버라이딩 했습니다.
helm repo add cnpg https://cloudnative-pg.github.io/charts
helm install cnpg cnpg/cloudnative-pg -f ~/DOIK/5/values.yaml
cat ~/DOIK/5/values.yaml
nodeSelector: {kubernetes.io/hostname: k8s-m}
tolerations: [{key: node-role.kubernetes.io/master, operator: Exists, effect: NoSchedule}]
operator는 deployment로 관리됩니다.
kubectl get deploy,po
클러스터 구성, 백업 등을 위한 crd가 생성되었습니다.
kubectl get crd
4. postgresql 클러스터 구성
operator에서 제공하는 crd를 이용하여 postgresql 클러스터를 구성합니다.
kubectl apply -f mycluster.yamlapiVersion: postgresql.cnpg.io/v1
kind: Cluster
metadata:
name: mycluster
spec:
imageName: ghcr.io/cloudnative-pg/postgresql:14.2
instances: 3
storage:
size: 3Gi
postgresql:
parameters:
max_worker_processes: "40"
timezone: "Asia/Seoul"
pg_hba:
- host all postgres all trust
primaryUpdateStrategy: unsupervised
enableSuperuserAccess: true
bootstrap:
initdb:
database: app
encoding: UTF8
localeCType: C
localeCollate: C
owner: app
클러스터 상태는 cluster crd로 조회할 수 있습니다.
kubectl get cluster
클러스터로 구성된 pod는 놀랍게도 deployment, statefulset 등으로 관리되지 않습니다. operator 자체가 pod를 생성하여 관리합니다.

cnpg플러그인으로 클러스터 상태를 조회할 수 있습니다.
kubectl cnpg status mycluster
standby 인스턴스 pod로그를 보면 read-only connection 활성 로그가 보입니다.
kubectl logs mycluster-1 | jq -r 'select(.logger=="postgres") | [(.ts|strflocaltime("%Y-%m-%dT%H:%M:%S %Z")), .record.message] | @csv'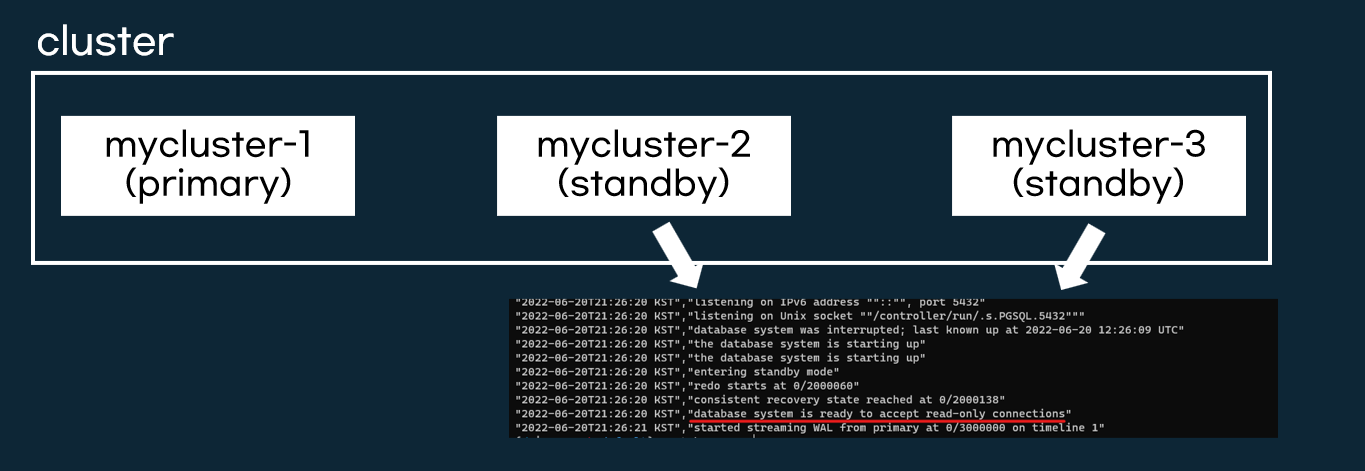
5. postgresql 접속
5.1 postgresql 클라이언트 pod배포
postgresql db인스턴스에 접근을 쉽게 하기 위해 클라이언트 pod 2개를 배포합니다. envsubst명령어를 이용하여 똑같은 pod를 이름만 변경해서 쉽게 배포할 수 있습니다.
for ((i=1; i<=2; i++)); do PODNAME=myclient$i VERSION=14.3.0 envsubst < myclient.yaml | kubectl apply -f - ; doneapiVersion: v1
kind: Pod
metadata:
name: ${PODNAME}
labels:
app: myclient
spec:
nodeName: k8s-m
containers:
- name: ${PODNAME}
image: bitnami/postgresql:${VERSION}
command: ["tail"]
args: ["-f", "/dev/null"]
terminationGracePeriodSeconds: 0
5.2 계정/비밀번호 조회
계정과 비밀번호는 쿠버네티스 secret에 저장되어 있습니다. 계정은 superuser와 일반계정이 있습니다.
- 슈퍼유저 계정과 비밀번호
# 계정
kubectl get secrets mycluster-superuser -o jsonpath={.data.username} | base64 -d ;echo
# 비밀번호
kubectl get secrets mycluster-superuser -o jsonpath={.data.password} | base64 -d ; echo
- 일반계정과 비밀번호
# 계정
kubectl get secrets mycluster-app -o jsonpath={.data.username} | base64 -d ;echo

# 비밀번호
kubectl get secrets mycluster-app -o jsonpath={.data.password} | base64 -d ; echo
5.3 postgresql 접속
클라이언트 pod로 postgresql에 접속합니다. 계정은 슈퍼유저를 사용했습니다. 접속할 인스턴스는 primary 인스턴스인 mycluster-rw입니다.
kubectl exec -it myclient1 -- psql -U postgres -h mycluster-rw -p 5432
6. 샘플데이터 삽입과 standy 인스턴스 복제상태 확인
6.1 샘플데이터 삽입
테스트를 위해 postgresqltutorial.com에서 제공하는 "DVD Rental Sample Database"데이터를 다운로드 받습니다.
curl -LO https://www.postgresqltutorial.com/wp-content/uploads/2019/05/dvdrental.zip
apt install unzip -y && unzip dvdrental.zip
그리고 kubectl cp명령어로 클라이언트에 데이터를 복사하고 pg_restore명령어로 데이터를 복사합니다.
# 클라이언트 pod에 데이터 복사
kubectl cp dvdrental.tar myclient1:/tmp

# 데이터 로드
kubectl exec -it myclient1 -- createdb -U postgres -h mycluster-rw -p 5432 dvdrental
kubectl exec -it myclient1 -- psql -U postgres -h mycluster-rw -p 5432 -l
kubectl exec -it myclient1 -- pg_restore -U postgres -d dvdrental /tmp/dvdrental.tar -h  mycluster-rw -p 5432

# 데이터 확인
kubectl exec -it myclient1 -- psql -U postgres -h mycluster-rw -p 5432 -d dvdrental -c "SELECT * FROM actor"
6.2 클러스터 복제 인스턴스 데이터 확인 - pod로 접근
pod DB인스턴스 pod IP로 각 DB인스턴스에 접근해보겠습니다. 각 DB인스턴스 pod IP를 변수로 저장합니다.
POD1=$(kubectl get pod mycluster-1 -o jsonpath={.status.podIP})
POD2=$(kubectl get pod mycluster-2 -o jsonpath={.status.podIP})
POD3=$(kubectl get pod mycluster-3 -o jsonpath={.status.podIP})
각각 DB인스턴스에 저장된 테이블 갯수를 조회하고 같은지 확인합니다. 아래 예제에서는 모두 200개로 같습니다.
kubectl exec -it myclient1 -- psql -U postgres -h $POD1 -p 5432 -d dvdrental -c "SELECT COUNT(*) FROM actor"
kubectl exec -it myclient1 -- psql -U postgres -h $POD2 -p 5432 -d dvdrental -c "SELECT COUNT(*) FROM actor"
kubectl exec -it myclient1 -- psql -U postgres -h $POD3 -p 5432 -d dvdrental -c "SELECT COUNT(*) FROM actor"
6.3 클러스터 복제 인스턴스 데이터 확인 - 쿠버네티스 서비스로 접근
역할에 따라 쿠버네티스 서비스도 분류되어 있습니다. 읽기 또는 쓰기 목적에 따라 서비스를 선택하여 DB인스턴스 pod에 접근할 수 있습니다.
- any: 읽기?를 위한 아무 DB인스턴스 접근
- rw: 쓰기를 위한 primary DB인스턴스 접근
- r: 읽기를 위한 아무 DB인스턴스 접근
- ro: 읽기를 위한 standby DB인스턴스 접근

rw서비스로 접근하면 primary DB인스턴스으로만 접근합니다.
for i in {1..30}; do kubectl exec -it myclient1 -- psql -U postgres -h mycluster-rw -p 5432 -c "select inet_server_addr();"; done | sort | uniq -c | sort -nr | grep 172
ro서비스로 접근하면 standby DB인스턴스에만 접근합니다.
for i in {1..30}; do kubectl exec -it myclient1 -- psql -U postgres -h mycluster-ro -p 5432 -c "select inet_server_addr();"; done | sort | uniq -c | sort -nr | grep 172
r서비스로 접근하면 모든 인스턴스에 접근합니다.
root@k8s-m:~# for i in {1..30}; do kubectl exec -it myclient1 -- psql -U postgres -h mycluster-r -p 5432 -c "select inet_server_addr();"; done | sort | uniq -c | sort -nr | grep 172
7. 장애 테스트
7.1 시나리오
2가지 장애 시나리오를 테스트 진행하려고 합니다. 장애가 발생하면 operator가 failover를 처리합니다.
- pod장애 - primary pod가 장애나는 상황
- 노드장애 - primary pod가 있는 노드가 장애가 나는 상황
7.2 준비
각 DB 인스턴스 POD IP를 리눅스 변수로 저장합니다.
POD1=$(kubectl get pod mycluster-1 -o jsonpath={.status.podIP})
POD2=$(kubectl get pod mycluster-2 -o jsonpath={.status.podIP})
POD3=$(kubectl get pod mycluster-3 -o jsonpath={.status.podIP})
장애테스트에 사용할 임시테이블 t1을 생성합니다. 쿼리는 [챕터 5.1]에서 생성한 클라이언트에서 실행합니다.
# 테이블 생성 쿼리
cat query.sql
CREATE DATABASE test;
\c test;
CREATE TABLE t1 (c1 INT PRIMARY KEY, c2 TEXT NOT NULL);
INSERT INTO t1 VALUES (1, 'Luis');
# 클라이언트에서 테스트 쿼리 실행
kubectl cp ~/DOIK/5/query.sql myclient1:/tmp
kubectl exec -it myclient1 -- psql -U postgres -h mycluster-rw -p 5432 -f /tmp/query.sql
7.3 시나리오1 - primary pod 장애
시나리오1번은 primary pod와 pvc를 삭제한 후 failover이 되는지 확인합니다.

장애 테스트를 실시간으로 모니터링하기 위해 분할 창을 실행하고 명령어를 입력합니다. 저는 tmux를 사용했습니다.
# ro쿠버네티스 서비스로 postgredb 인스턴스 접근
1. while true; do kubectl exec -it myclient2 -- psql -U postgres -h mycluster-ro -p 5432 -d test -c "SELECT COUNT(*) FROM t1"; date;sleep 1; done

# DB인스턴스 pod 모니터링
2. watch kubectl get pod -l cnpg.io/cluster=mycluster

# primary DB인스턴스에 테스트데이터 삽입
3. for ((i=301; i<=10000; i++)); do kubectl exec -it myclient1 -- psql -U postgres -h mycluster-rw -p 5432 -d test -c "INSERT INTO t1 VALUES ($i, 'Luis$i');";echo; done
primary DB인스턴스인 mycluster-1 pod와 pvc를 삭제합니다. 삭제되는 순간 잠시 쓰기작업이 중단됩니다.
kubectl delete pvc/mycluster-1 pod/mycluster-1
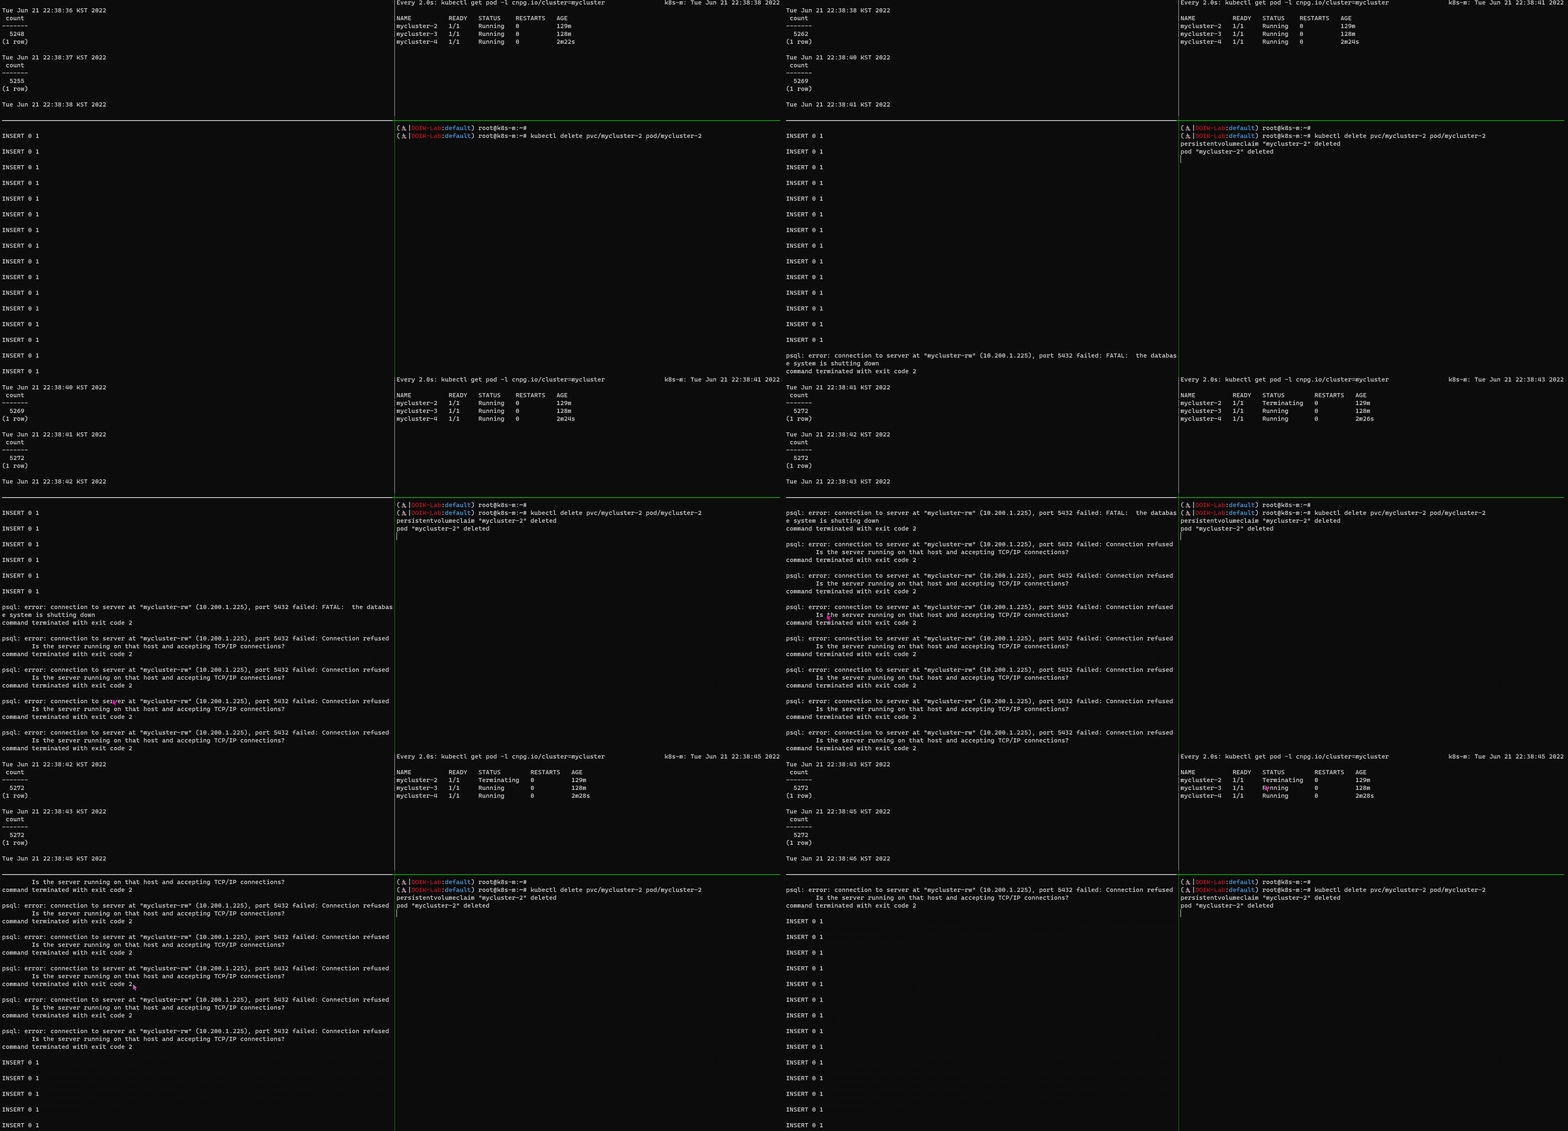
operator가 primary장애가 발생한 것을 인지하고 standby DB 인스턴스 pod 중 1개를 primary DB 인스턴스로 변경합니다. 그리고 클러스터 구성을 위해 새로운 DB 인스턴스 pod를 생성하고 클러스터 구성을 합니다.

변경된 DB 인스턴스 역할은 cnpg플러그인으로 확인할 수 있습니다.
kubectl cnpg status mycluster
7.4 시나리오2 - primary pod가 있는 노드장애
2번째 시나리오는 primary DB인스턴스 pod가 있는 노드 장애입니다. drain으로 노드를 장애 일으킵니다.

실시간 모니터링을 준비합니다.
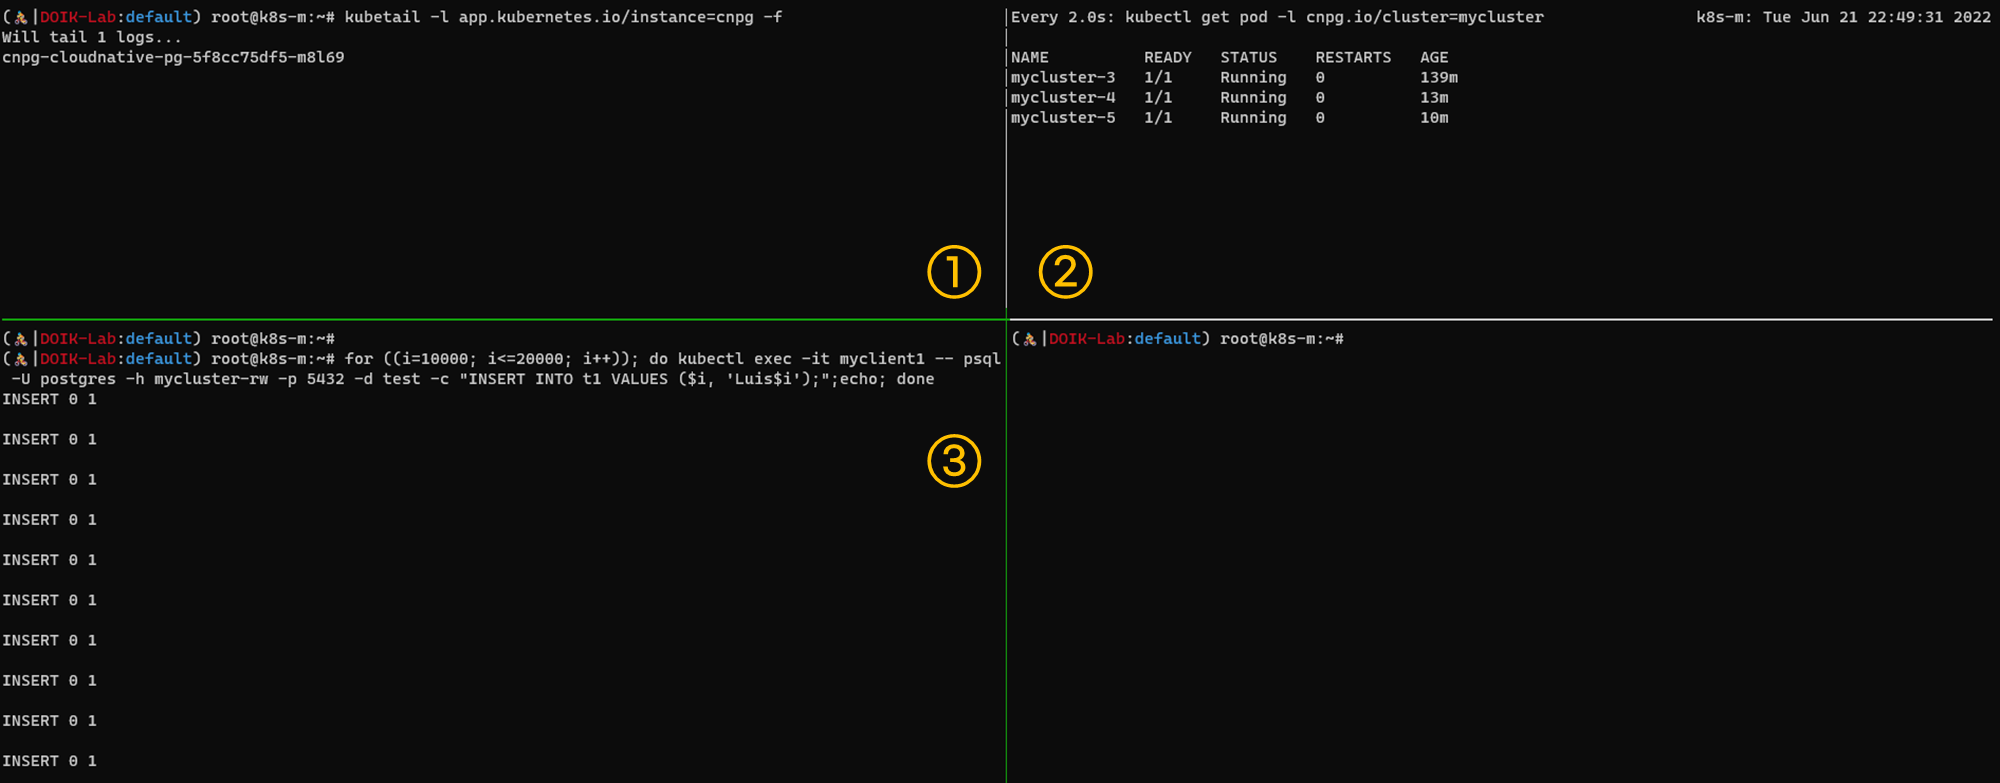
# 오퍼레이터 모니터링
1. kubetail -l app.kubernetes.io/instance=cnpg -f

# DB인스턴스 pod 모니터링
2. watch kubectl get pod -l cnpg.io/cluster=mycluster

# primary DB인스턴스에 테스트데이터 삽입
3. for ((i=10000; i<=20000; i++)); do kubectl exec -it myclient1 -- psql -U postgres -h mycluster-rw -p 5432 -d test -c "INSERT INTO t1 VALUES ($i, 'Luis$i');";echo; done
저는 worker-2번노드가 primary pod가 있으므로 worker-2노드를 대상으로 drain을 실행하겠습니다.
kubectl drain k8s-w2 --delete-emptydir-data --force --ignore-daemonsets
노드가 장애(drain 되는기간)가 primary pod가 장애납니다. operator는 이를 primary 장애를 감시했고 Insert 쿼리도 실패합니다.
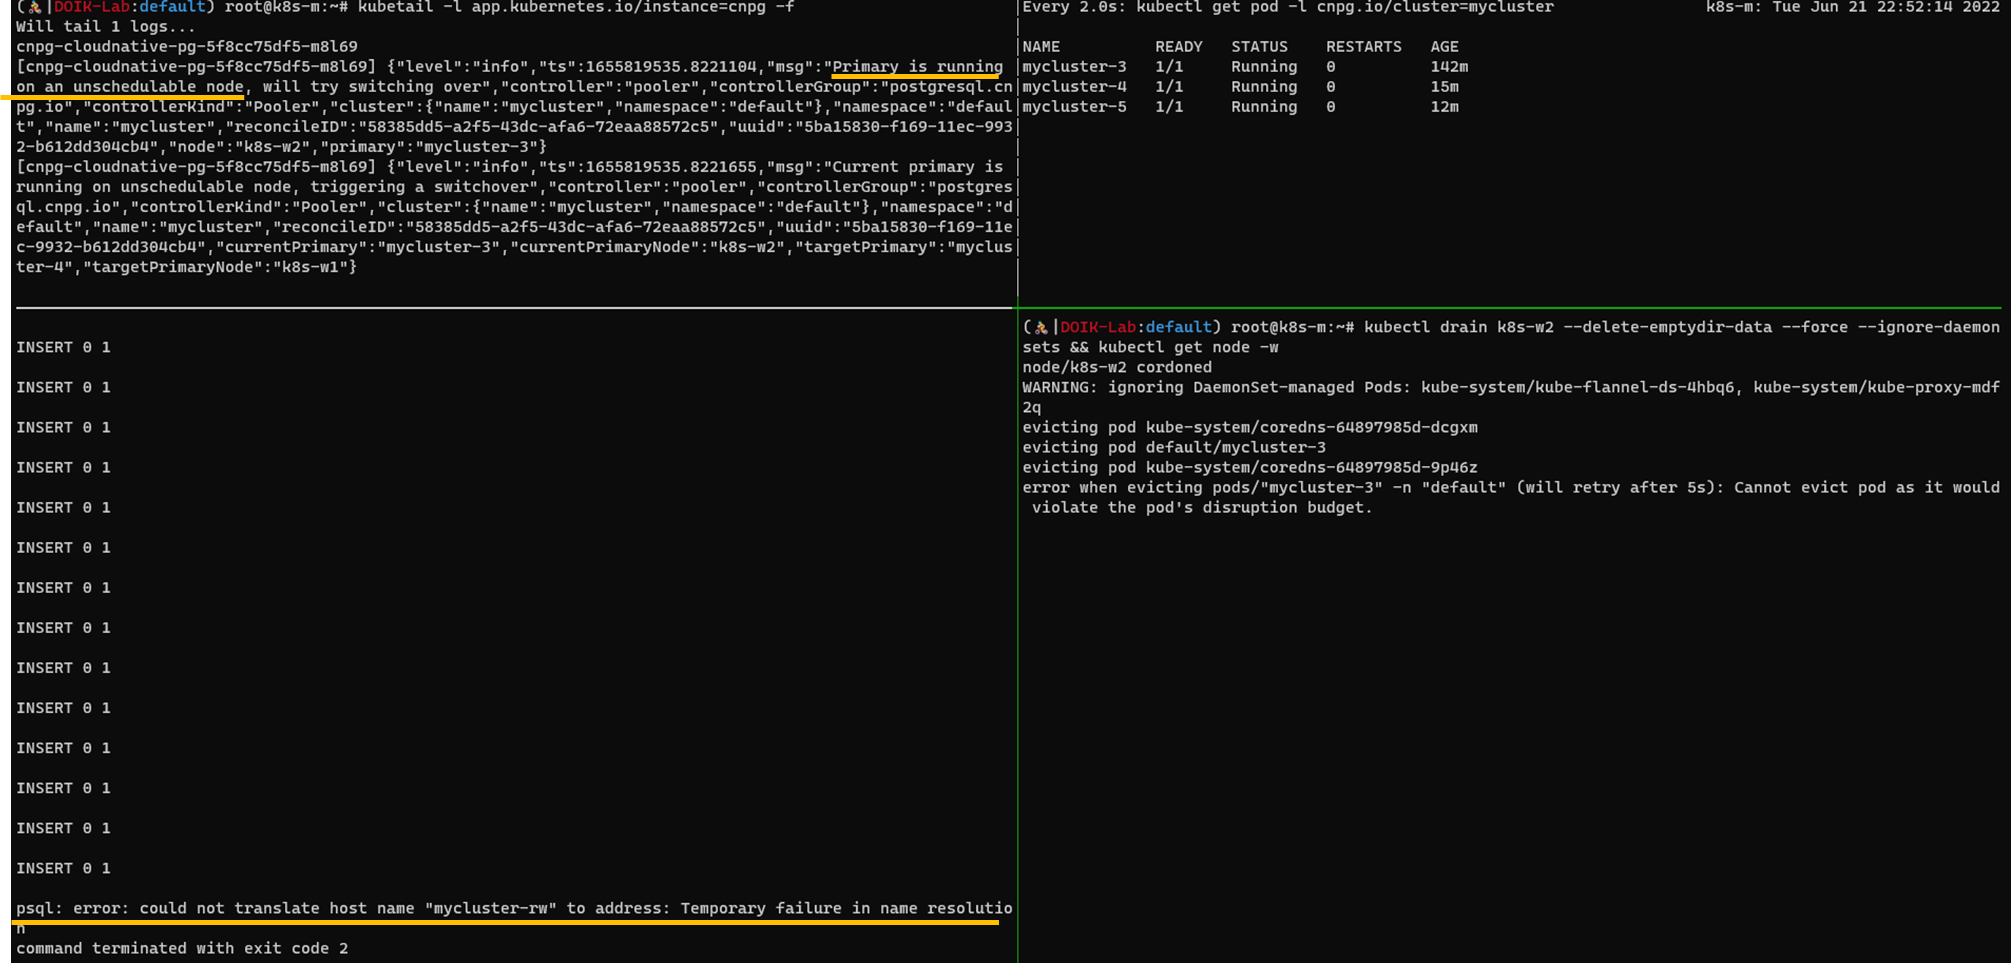
operator가 failover을 정상적으로 동작하면 standby 인스턴스 중 하나가 primary 인스턴스로 전환됩니다. Insert 쿼리도 정상적으로 동작됩니다.

장애가 났던 pod는 해당 노드가 스케쥴이 불가능이므로 pending상태에 있습니다. uncordon명령어로 다시 스케쥴 상태로 변경하면 pod가 다시 running상태로 변경됩니다.
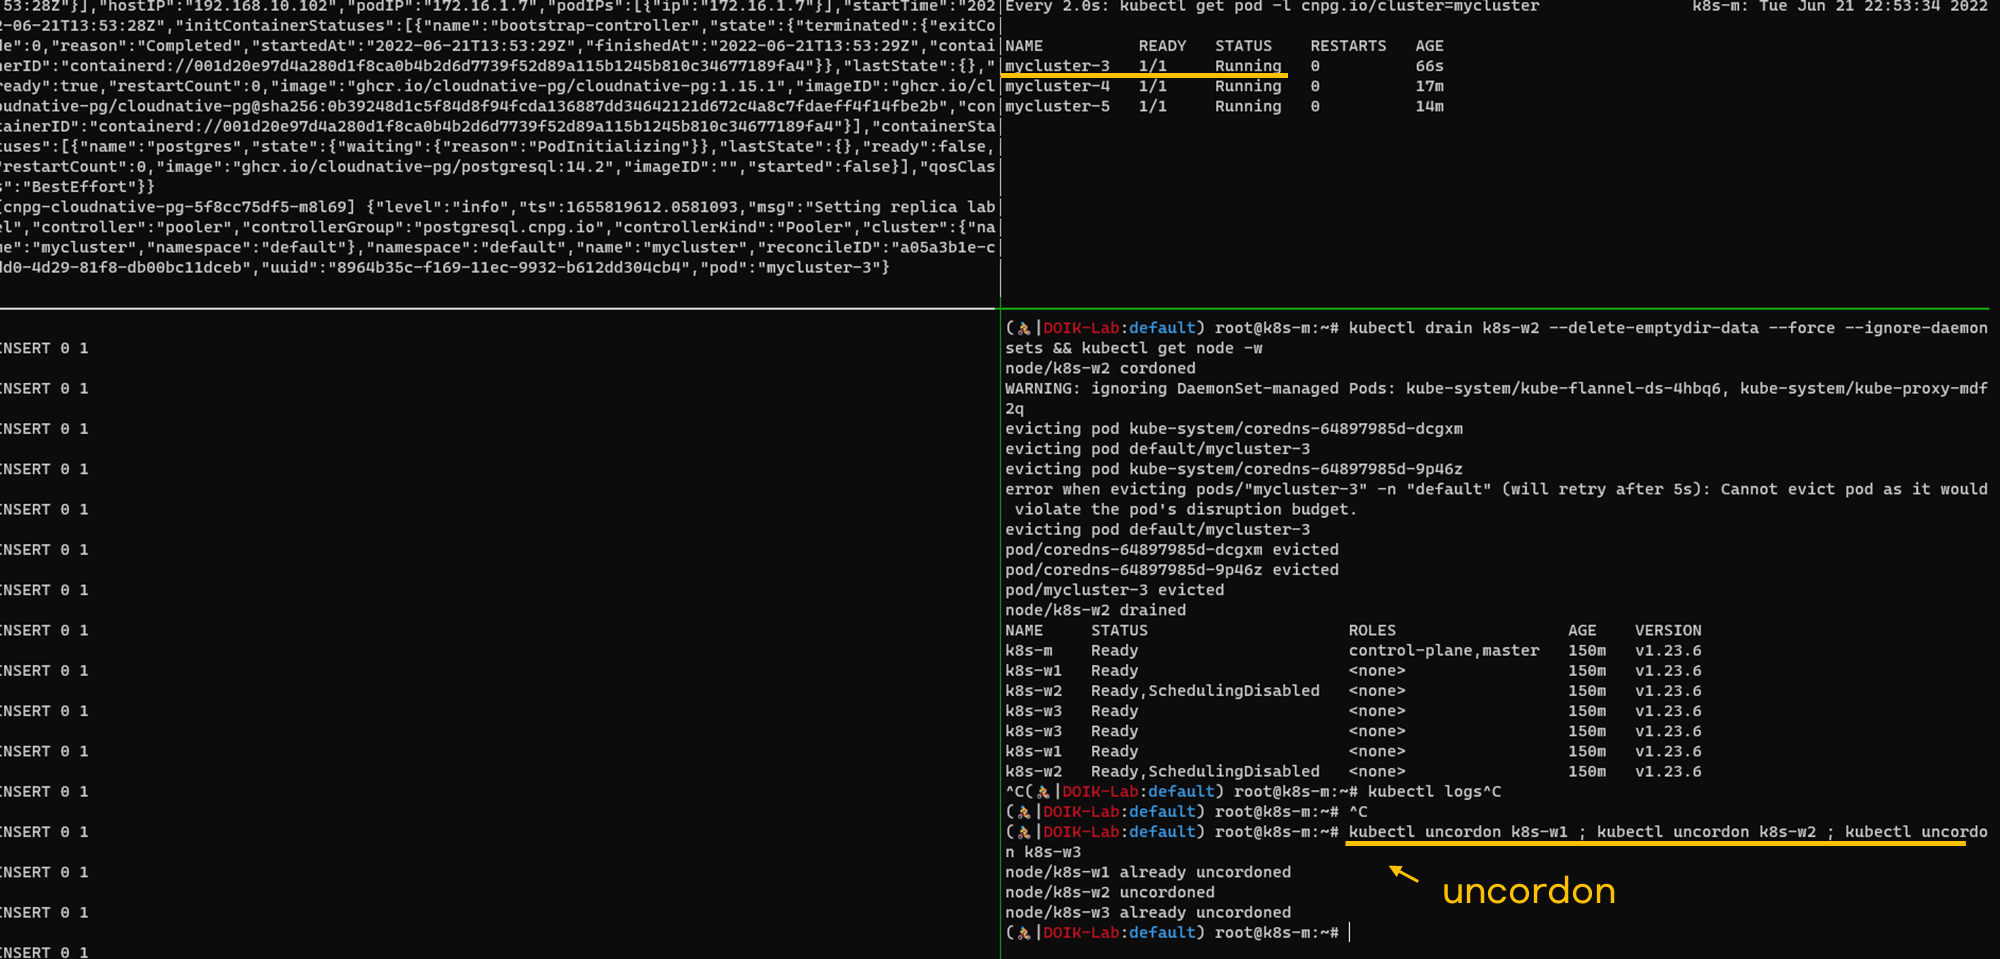
지금까지 내용을 gif로 정리했습니다.

참고자료
- EDB공식문서 - 복제방법 정리: https://www.enterprisedb.com/postgres-tutorials/postgresql-replication-and-automatic-failover-tutorial
공백
'연재 시리즈' 카테고리의 다른 글
| kustomize 2편 - kustomize 컨셉 (0) | 2022.08.03 |
|---|---|
| kustomize 1편 - kustomize란? (0) | 2022.08.02 |
| 쿠버네티스 오퍼레이터 스터디 3주차 - strimzi operator를 이용한 카프카 토픽 읽기/쓰기 작업 (0) | 2022.06.12 |
| 쿠버네티스 오퍼레이터 스터디 3주차 - strimzi operator를 이용한 카프카 토픽 생성 (0) | 2022.06.12 |
| 쿠버네티스 오퍼레이터 스터디 3주차 - strimzi operator를 이용한 카프카 클러스터 설치 (4) | 2022.06.11 |