안녕하세요. 이 글은 kustomize를 처음 공부할 때, 도움이 될 자료를 정리했습니다.
영상: https://youtu.be/fXPK5sbVIPk
1. Kustomize란?
kustomize는 쿠버네티스 리소스(yaml파일)를 변경하지 않고 필드를 재정의하여 새로운 쿠버네티스 리소스를 생성하는 도구입니다.

글로 보는 것보다 직접 실습하면 바로 어떤 도구인지 알 수 있을 것 같아요! 제 github repo를 다운로드 받고 example_1폴더에 있는 파일을 살펴봅시다.
github 링크: https://github.com/choisungwook/kustomize-example
pod.yaml과 kustomization.yaml파일이 실습에 필요한 파일입니다. kustomization.yaml파일은 kustomize를 실행하기 위한 설정 파일입니다. 아직 알아가는 단계이니 자세한 설명은 생략하겠습니다

pod.yaml파일은 nginx:latest이미지를 사용하여 nginx pod를 실행하는 간단한 예제입니다.
apiVersion: v1
kind: Pod
metadata:
  name: nginx
  labels:
    name: nginx
spec:
  containers:
  - name: nginx
    image: nginx:latest
    resources:
      limits:
        memory: "64Mi"
        cpu: "100m"
이제 kustomize 도구를 사용해보겠습니다. kustomize build 명령어가 kubectl에 내장되어 별도 설치가 필요 없습니다. kubectl kustomize명령어로 kustomize를 실행할 수 있는데요!. stdout으로 실행결과가 출력됩니다.
kustomize build가 아닌 다른 명령어를 사용하려면 kustomize도구 설치가 필요합니다.
kubectl kustomize ./
실행결과를 보시면 pod.yaml에 정의되어 있는 image가 변경되었습니다. 그리고 놀랍게도 pod.yaml은 변경되지 않았습니다.

이미지가 변경된 이유는 kustomization.yaml파일 설정때문입니다. nginx image를 nginx:1.23.1로 변경하라고 설정되어 있습니다.
$ cat kustomization.yaml
esources:
  - pod.yaml
images:
  - name: nginx
    newName: nginx
    newTag: 1.23.1
2. kustomize로 쿠버네티스 리소스 생성과 삭제
2.1 생성
kustomize 실행결과를 쉘 파이프라인과 kubectl apply -로 쿠버네티스 리소스를 생성할 수 있습니다.
$ kubectl kustomize ./ | kubectl apply -f -

생성된 pod의 이미지를 확인하면 nginx:1.23.1입니다. pod.yaml은 latest이지만 kustomize가 1.23.1로 변경했으므로 최종단계에서는 nginx:1.23.1로 적용되었습니다.
$ kubectl describe po nginx | grep -i image
2.2 삭제
kustomize 실행결과를 쉘 파이프라인과 kubectl delete -로 쿠버네티스 리소스를 삭제할 수 있습니다.
$ kubectl kustomize ./ | kubectl delete -f -
3. kustomize 사용방법
3.1 실행조건
kustomization.yaml파일이만 있으면 kustomize명령어를 실행할 수 있습니다. 그리고, kustomize를 적용할 yaml파일을 준비합니다. 보통 kustomization.yaml파일이 있는 같은 경로에 yaml파일을 위치시킵니다.
yaml파일이 없어도 kustomization.yaml만 있으면 동작을 합니다. yaml파일이 없는 상황은 새로운 쿠버네티스 리소스를 만들려고할 때 사용합니다.
$ tree
.
├── kustomization.yaml
└── pod.yaml
3.2 kustomization.yaml파일이란?
kustomization.yaml은 kustomize가 실행될 때 어떤 필드를 재정의할 것인가를 설정하는 파일입니다. 여러가지 필드(플러그인)로 설정할 수 있는데 공식문서(https://kubectl.docs.kubernetes.io/references/kustomize/kustomization/)에서 소개하는 기본 필드는 4개입니다. 그 이외의 patch, namespace 등의 필드가 존재합니다.
개인생각으로 다른 필드는 transformers유형으로 취급되는 것 같습니다.
- resources 필드: kustomize를 적용할 쿠버네티스 리소스(yaml파일)
- generators 필드: 새로 생성할 필드를 설정
- transformers 필드: 기존 필드 변경을 설정
- validators 필드: 검증

필드는 정해진 순서로 실행됩니다. 공식문서에 소개된 필드는 resources → generators → transformers → validators 순서로 실행됩니다. 실행과정을 정리하면 기존 정의된 쿠버네티스 리소스yaml파일을 읽고 새로운 필드를 추가(generators)한 후, 필드를 수정(transformers)하고 검증(validators)을 합니다. 검증이 끝나면 최종 쿠버네티스 리소스를 화면에 출력(stdout)합니다.
4가지 필드가 아닌 다른 필드는 정확하지 않지만 아마도? transfomers유형으로 취급되어 3번째 순서로 실행되는 것 같아요
3.3 built-ins 플러그인
kustomization.yaml 필드는 플러그인으로 구성됩니다. 사용자는 built-ins(내장) 플러그인을 찾아 기능을 구현하고 원하는 플러그인이 없다면 직접 개발해서 사용할 수 있습니다. kustomize의 아쉬운 점은 공식문서가 여기저기 흟어져 있습니다. github와 홈페이지, 쿠버네티스 문서를 찾아 built-ins플러그인을 찾아야 합니다.
- github: https://github.com/kubernetes-sigs/kustomize/tree/master/examples
- 홈페이지: https://kubectl.docs.kubernetes.io/guides/
- 쿠버네티스 문서: https://kubernetes.io/ko/docs/tasks/manage-kubernetes-objects/kustomization/
built-ins 플러그인은 go-lang으로 개발되었고 github에 공개되어있습니다.
4. resources필드
4.1 의미
resources 필드는 kustomize를 적용할 yaml파일을 선택합니다. 쉽게 비유하면 kustomize input을 설정하는 필드입니다. 주의사항은 선택하지 않은 yaml파일은 같은 경로에 있더라도 최종 결과물에 제외됩니다.
4.2 예제
예제를 살펴볼게요. 제 githuh repo를 다운로드 받으신 후, example_2폴더로 이동합니다. example_2에는 2개의 yaml파일과 kustomization.yaml파일이 있습니다.
github링크: https://github.com/choisungwook/kustomize-example
➜   tree
.
├── Readme.md
├── kustomization.yaml
├── pod.yaml
└── service.yaml
kustomization.yaml파일을 보면 resources필드에 pod.yaml, service.yaml파일을 설정했습니다. 즉, kustomize를 적용할 대상을 pod.yaml, service.yaml파일로 지정한 것입니다.
➜   cat kustomization.yaml
resources:
  - pod.yaml
  - service.yaml
kubectl kustomize명령어를 사용하면 pod.yaml, service.yaml파일에 정의된 쿠버네티스 리소스가 그대로 화면에 출력됩니다.
➜ kubectl kustomize ./
5. Generators
5.1 의미
Generators는 새로운 쿠버네티스 리소스 또는 필드를 생성합니다. 그래서 생성하는 의미인 Generators이름을 갖지 않았나 생각합니다. 예로 configmap, secret 등을 생성할 수 있습니다.
사용할 수 있는 built-in Generators 플러그인은 공식문서에 나열되어 있습니다. Generator로 끝나는 built-ins 플러그인은 필드를 생성하게 됩니다.
링크: https://kubectl.docs.kubernetes.io/references/kustomize/builtins/

Generators이름으로 끝나는 플러그인 이외에도 필드를 생성할 수 있습니다.
링크: https://kubectl.docs.kubernetes.io/references/kustomize/kustomization/

5.2 예제1
Generators는 필드를 생성하기 때문에 resources필드로 yaml파일을 선택하지 않아도 동작합니다. 예제를 살펴볼게요. 제 github repo의 example_3폴더에 있는 예제입니다. 폴더구조를 보면 kustomization.yaml파일을 제외하고 yaml파일이 없습니다. 즉, resources로 선택할 yaml파일이 없습니다.
github링크: https://github.com/choisungwook/kustomize-example
$ tree
.
├── Readme.md
├── application.properties
└── kustomization.yaml
kustomization.yaml파일은 ConfigMapGenerator을 사용하여 configmap을 생성하도록 설정했습니다.
$ cat kustomization.yaml
configMapGenerator:
- name: example-configmap-1
  files:
  - application.properties
configmap을 생성할 때 application.properties파일을 이용합니다.
$ cat application.properties
Foo=Bar
kubectl kustomize명령어를 사용하면 configmap리소스 정의가 화면에 출력됩니다. 재밌는 점은 metadata.name이름 뒤에 랜덤값이 붙습니다.
generatorOptions 설정을 추가하여 랜덤값을 제거할 수 있습니다.
$ kubectl kustomize ./
5.3 예제2
이번에는 resources로 yaml파일을 선택하고 configmap을 사용해보겠습니다. github repo의 example_4폴더에 있는 예제입니다.
github링크: https://github.com/choisungwook/kustomize-example
$ tree
.
├── Readme.md
├── application.properties
├── deployment.yaml
└── kustomization.yaml
kustomization.yaml파일에는 resources필드로 deployment.yaml파일을 선택했습니다. 그리고 ConfigMapGenerator를 사용하여 configmap을 생성합니다.
$ cat kustomization.yaml
resources:
- deployment.yaml
configMapGenerator:
- name: example-configmap-1
  files:
  - application.properties
deployment.yaml은 ConfigMapGenerator이 생성한 configmap을 사용합니다.
$ cat deployment.yaml
apiVersion: apps/v1
kind: Deployment
...
spec:
  ...
      volumes:
      - name: config
        configMap:
          name: example-configmap-1
kubectl kustomize명령어를 사용하면 configmap리소스 정의와 deployment.yaml 내용이 화면에 출력됩니다. deployment.yaml에 있는 configmap이름은 kustomize가 생성한 configmap이름과 같습니다. configmap이름에 랜덤값이 포함되어 있습니다.
kubectl kustomize ./
6. Transformers
6.1 의미
Transformers는 필드 값을 변경합니다. built-ins 플러그인 Transformers는 이름이 다양합니다. 심플하게 이름이 Transformers로 끝날 수 있고 Patch등 많은 유형이 있습니다.
참고자료: https://kubectl.docs.kubernetes.io/references/kustomize/builtins/#_namespacetransformer_

6.2 예제
예제는 ImageTagTransformer를 사용합니다. ImageTagTransformer는 컨테이너 이미지 이름과 태그를 수정합니다. CI/CD파이프라인에서 자주 사용됩니다.
예제를 살펴볼게요. 제 github repo의 example_1폴더에 있는 예제입니다.
github링크: https://github.com/choisungwook/kustomize-example
$ tree                                                                                                                                                                                                                                  130 ↵
.
├── Readme.md
├── kustomization.yaml
└── pod.yaml
ustomization.yaml파일은 ImageTagTransformer를 사용해서 pod.yaml에 있는 컨테이너 이미지를 수정합니다. nginx필드를 갖는 컨테이너 이미지 이름을 nginx:1.23.1로 수정합니다.
$ cat kustomization.yaml
resources:
  - pod.yaml
images:
  - name: nginx
    newName: nginx
    newTag: 1.23.1
pod.yaml을 보면 nginx필드의 컨테이너 이미지 이름은 nginx:latest입니다.
$ cat pod.yaml
apiVersion: v1
kind: Pod
...
spec:
  containers:
  - name: nginx
    image: nginx:latest
   ...
kustomize build를 실행하면 놀랍게도 nginx:latest가 nginx:1.23.1로 수정됩니다. 중요한건 pod.yaml파일 내용이 수정되지 않습니다.
$ kubectl kustomize ./
7. cross-cutting
7.1 의미
아마도 cross-cutting은 kustomize의 강력한 기능이지 않을까 생각합니다. cross-cutting필드는 한국말로 번역하면 교차편집 필드입니다. Generators 또는 Transformers로 필드가 재정의될 때 참조되는 다른 필드도 같이 재정의됩니다. 참조필드도 재정의하므로 교차편집이라는 의미가 붙은 것 같습니다.
활용사례는 쿠버네티스 공식(tttps://kubernetes.io/ko/docs/tasks/manage-kubernetes-objects/kustomization/#교차-편집-필드-설정)에 소개되어 있습니다.
- 모든 리소스에 동일한 네임스페이스를 설정
- 동일한 네임 접두사 또는 접미사를 추가
- 동일한 레이블들을 추가
- 동일한 어노테이션들을 추가
7.2 예제1
예제를 살펴볼게요. 제 github repo의 example_7폴더에 있는 예제입니다.
github링크: https://github.com/choisungwook/kustomize-example
$ tree                                                                                                                                                                                                                                                           130 ↵
.
├── Readme.md
├── deployment.yaml
└── kustomization.yaml
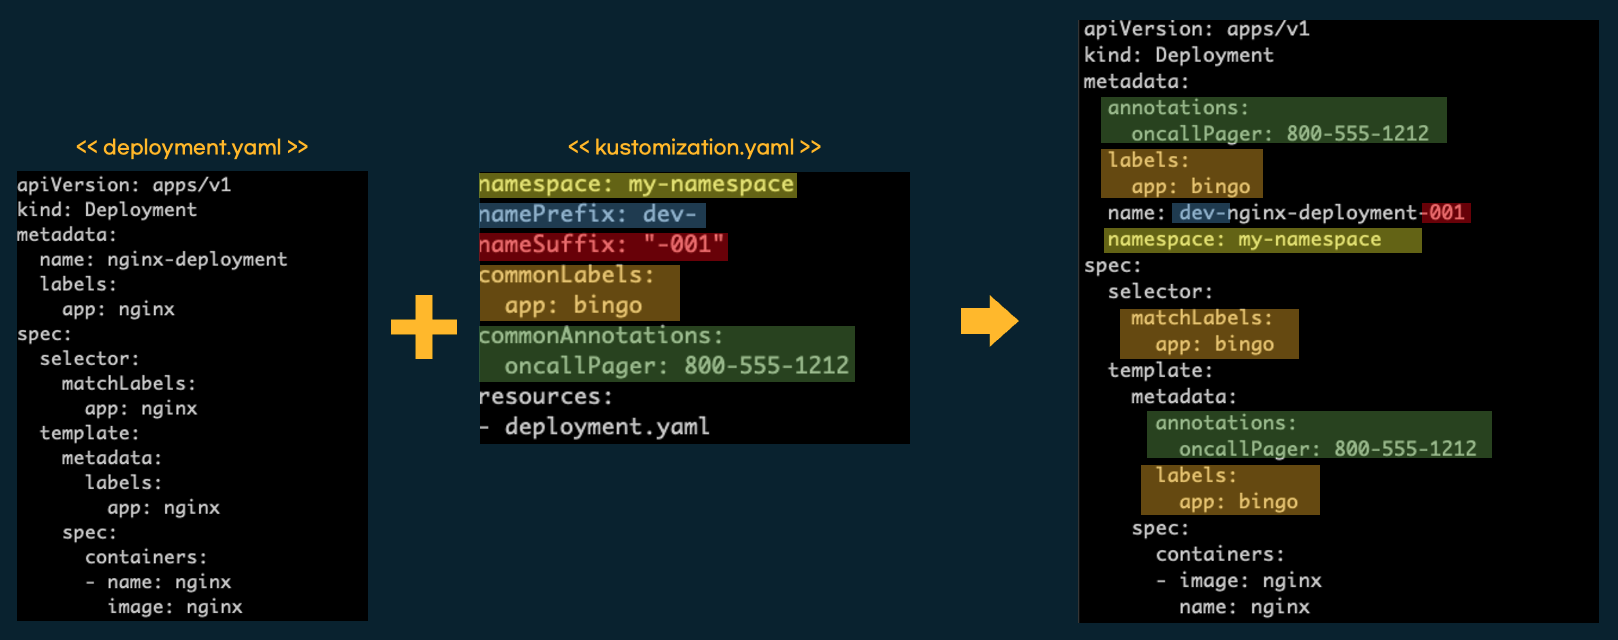
example_7 예제는 label, annotations 필드를 정의하기 위해 Generators와 Transformers를 사용하고 있습니다.
$ cat kustomization.yaml
namespace: my-namespace
namePrefix: dev-
nameSuffix: "-001"
commonLabels:
  app: bingo
commonAnnotations:
  oncallPager: 800-555-1212
resources:
- deployment.yaml
kubectl kustomize명령어를 사용하면 재정의된 필드를 확인할 수 있습니다. Label은 metadata.label뿐만 아니라 spec에 있는 label로 변경되었습니다. annotation또한 metadata.annotations과 sepc.annotations 필드가 수정되었습니다. 영향이 미치는 다른 필드들도 교차편집되었습니다.
$ kubectl kustomize ./
7.3 예제2
cross-cutting의 장점은 연관관계가 설정된 쿠버네티스 필드를 감지해서 자동으로 수정합니다. 예를 들어 Ingress는 service name을 참조하는데, kustomize 명령어로 service name이 변경되면 Ingress의 service name도 자동 수정됩니다.

예제를 살펴볼게요. 제 github repo의 example_8폴더에 있는 예제입니다.
github링크: https://github.com/choisungwook/kustomize-example
$ tree
.
├── Readme.md
├── deployment.yaml
├── ingress.yaml
├── kustomization.yaml
└── service.yaml
kustomization.yaml파일에는 label을 수정하고 리소스 name을 수정합니다.
$ cat kustomization.yaml                                                                                                                                                                                                                                         130 ↵
resources:
- deployment.yaml
- service.yaml
- ingress.yaml
namePrefix: dev-
commonLabels:
  app: dev-helloworld
label이 수정되므로 참조되고 있는 service selector의 label도 같이 수정됩니다. service name이 수정되므로 Ingress가 참조하는 service name도 수정됩니다

kubectl kustomize명령어를 사용하면 label, name이 재정의되고 참조되는 필드 값도 같이 수정된 것을 확인할 수 있습니다.
$ kubectl kustomize ./
8. Base/Overlays
8.1 의미
kustomize 실행결과를 다른 곳에서 불러서 사용하는 것을 Base/Overlays라고 합니다. 마치 kustomize로 템플릿을 만들고 템플릿 실행결과를 다른 곳에 kustomize로 사용하는 방법입니다.

8.2 활용사례
base/overlays는 배포를 단계별로 분리해서 사용하는 환경에 많이 사용됩니다. 규모가 큰 곳은 dev, stage, prod로 구분해서 배포를 진행합니다. 배포 설정은 endpoint, 환경 변수를 제외하고는 대부분 비슷합니다. 비슷한 쿠버네티스 리소스 설정이 많은 경우 kustomize base/overlays를 사용하면 효율적으로 배포할 수 있습니다.

8.3 예제
예제를 살펴볼게요. 제 github repo의 example_9폴더에 있는 예제입니다. base폴더와 overlays폴더가 있습니다. 그리고 각각 폴더에 kustomization.yaml파일이 있습니다.
github링크: https://github.com/choisungwook/kustomize-example
main ✗ $ tree                                                                                                                                                                                                                                                           130 ↵
.
├── base
│   ├── deployment.yaml
│   └── kustomization.yaml
└── overlays
    └── kustomization.yaml
base kustomization.yaml은 resources필드를 이용하여 deployment.yaml파일을 불러오고 있습니다.
$ cat base/kustomization.yaml
resources:
- deployment.yaml
overlays/kustomizaiton.yaml파일은 bases필드를 이용하여 base폴더의 kustomize결과를 input으로 사용합니다. 그리고 namePrefix로 리소스 name을 수정합니다.
$ cat overlays/kustomization.yaml
bases:
- ../base
namePrefix: dev-
kubectl kustomize overlays명령어를 사용하면 deployment리소스가 화면에 출력됩니다. overlay/kustomization.yaml에 namePrefix때문에 metadata.name이 수정됩니다.

9. Helm연동
9.1 Helm 연동 이유과 장단점
kustomize는 helm과 같이 사용할 수 있습니다. kustomize에서 helm chart를 가져오고 kustomize기능을 수행합니다.
kustomize는 helm의 단점을 보완합니다. helm은 values.yaml에 미리 정의된 필드만 수정 가능한 단점이 있습니다. kustomize는 Generators 등 필드를 생성할 수 있으므로 helm의 단점을 보완합니다.
하지만 helm과 kustomize를 같이 쓰면 단점도 있겠죠. helm chart를 사용하지만 쿠버네티스에 적용하는거는 helm을 이용하지 않으므로 helm rivision관리를 사용하지 못합니다. 즉, helm의 장점인 버전관리를 사용하지 못합니다. helm chart 버전만 관리할 수 있습니다.
9.2 built-ins 플러그인
kustomize에서는 helm built-ins이 2개 존재합니다. HelmChartInflationGenerator과 helmCharts가 있습니다. 정확히 알지는 못하지만, 처음에 한개는 built-ins이고 외부 플러그인인 것 같습니다. 그러다가 kustomize버전이 높아지면서 두개다 Built-ins로 포함된 것 같습니다. kustomize 현재 버전에 지원하는 built-ins 플러그인을 선택하여 사용하시면 됩니다.
- HelmChartInflationGenerator: https://kubectl.docs.kubernetes.io/references/kustomize/builtins/#_helmchartinflationgenerator_
- helmCharts: https://github.com/kubernetes-sigs/kustomize/blob/master/examples/chart.md
9.3 예제
예제를 살펴볼게요. 저는 HelmChartInflationGenerator 플러그인을 사용했습니다. 제 github repo의 example_10폴더에 있는 예제입니다. charts폴더는 예제 chart를 만들기 위한 작업공간이고 kustomize 실행과 관련없는 폴더입니다.
github링크: https://github.com/choisungwook/kustomize-example
$ tree -L 1                                                                                                                                                                     130 ↵
.
├── charts
└── kustomization.yaml
kustomization.yaml파일에는 HelmChartInflationGenerator과 helmCharts예제를 설정했습니다. 예제에 사용하는 helm chart는 제 github repo에 등록되어있습니다.
helm charts 링크: https://github.com/choisungwook/kustomize-example/tree/main/charts
$ cat base/kustomization.yaml
helmChartInflationGenerator:
- chartName: nginx-demo
  chartRepoUrl: https://choisungwook.github.io/kustomize-example/charts
  chartVersion: 0.1.0
  releaseName: test
  releaseNamespace: ttt # 무시됨

# helmCharts:
# - name: nginx-demo
#   includeCRDs: false
#   releaseName: test
#   namespace: ttt ## 무시됨
#   version: 0.1.0
#   repo: https://choisungwook.github.io/kustomize-example/charts

namespace: dev
kustomize로 helm을 사용하려면 --enable-helm인자가 필요합니다.
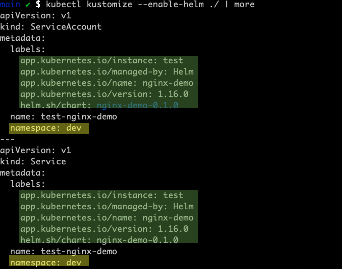
kubectl kustomize --enable-helm ./
내부 동작은 helm pull → helm template → kustoimze 순서로 실행되는 것 같아요. 즉, helm 명령어가 먼저 실행되고 kustomize를 실행하기 때문에 helm에서 설정한 일부 필드가 kustomize단계에서 재정의될수 있습니다. 위의 예제에서는 releaseNamespace에 설정한 namespace가 적용되지 않습니다. 사실, kustomize namespace를 제거해도 helm post render?문제 때문에 적용되지 않습니다. 이 문제는 github issue에 등록되어 해결하는 중인 것 같습니다.
또 다른 특징은 helm으로 쿠버네티스 리소스를 생성했기 때문에 label에 helm정보가 있습니다. 그리고 가장 중요한 건 결국, 마지막에 kustomize로 쿠버네티스 리소스를 배포하기 때문에 helm list에 배포한 리소스가 보이지 않습니다.
kubectl create ns dev
kubectl kustomize --enable-helm ./ | kubectl apply -f -
helm list -n ns
10. 마치며
kustomize는 쿠버네티스 필수 기능이 아니라 보조기능입니다. 따라서 kustomize를 몰라도 쿠버네티스를 운영할 수 있지만 리소스를 효율적으로 관리하는 고민이 생길 때 충분히 후보에 넣을 도구입니다. 다른 도구(예: ArgoCD, helm)과 호환성이 좋아 도입시 단점보다 장점이 많은 것 같아요.
kustomize는 쿠버네티스처럼 상당히 공부할 양 양이 많아서 다 하기에는 벅찹니다. 그러므로 컨셉을 이해하고 필요한 built-ins플러그인을 사용하고 없다면 직접 개발하는 방향으로 kustomize를 공부하는 것이 좋다고 생각합니다.
11. 참고자료
- https://www.r-bloggers.com/2021/02/kustomize-best-practices/
- https://www.densify.com/kubernetes-tools/kustomize
- 예제: https://fabianlee.org/2022/04/18/kubernetes-kustomize-transformations-with-patchesstrategicmerge/
- https://foxutech.medium.com/kustomize-its-features-and-best-practices-fc762de146f9
- https://blog.stack-labs.com/code/kustomize-101/
- Yq와 kustomize: https://learnk8s.io/templating-yaml-with-code
- https://rm3l.org/using-system-envvars-with-kustomize/
- https://povilasv.me/helm-kustomize-better-together/
- https://cloud.google.com/anthos-config-management/docs/how-to/use-repo-kustomize-helm
- https://blog.okami.dev/kustomizing-with-helm/
- https://tech.aabouzaid.com/2020/09/3-ways-to-customize-off-the-shelf-helm-charts-with-kustomize-kubernetes.html
- https://nimtechnology.com/2022/05/22/kustomize-2/
- helm repo index: https://uzihoon.com/post/b1765d60-5ed9-11ea-9252-e1204d96fe61
- https://happycloud-lee.tistory.com/m/5
- helmplugin local charts: https://github.com/kubernetes-sigs/kustomize/issues/3658
- helmcharts plugin local charts: https://github.com/kubernetes-sigs/kustomize/issues/4378
- helm pull from file: https://github.com/helm/helm/issues/7584
- github page helm charts: https://youtu.be/Xp8gTpSYyRo
'연재 시리즈' 카테고리의 다른 글
| ArgoCD 2편 - 설치 (3) | 2022.08.12 |
|---|---|
| ArgoCD 1편 - 컨셉과 장단점 (0) | 2022.08.12 |
| kustomize 3편 - resources필드 의미 (0) | 2022.08.03 |
| kustomize 2편 - kustomize 컨셉 (0) | 2022.08.03 |
| kustomize 1편 - kustomize란? (0) | 2022.08.02 |