이 글은 flux가 무엇이고 간단한 예제를 살펴봅니다. 예제를 쉽게 따라하기 위해 모든 예제는 flux CLI를 사용합니다.
flux란?
flux는 쿠버네티스를 위한 gitops 도구입니다. flux는 git에 있는 쿠버네티스를 manifest를 읽고, 쿠버네티스에 manifest를 배포합니다.

flux와 argocd 비교
flux는 argocd와 같은 역할을 하고 있어 비교대상으로 자주 언급됩니다.
flux를 잠깐 써본 경험으로, flux는 argocd에 비해 kustomize에 매우 특화된 도구로 느꼈습니다. argocd는 kustomize를 사용할 때 디폴트 설정이 부족하기 때문에, argocd configmap에서 kustomize옵션을 한땀한땀 설정해야 합니다. 반면에 flux는 바로 kustomize를 사용하도록 설정이 된 것 같았습니다.
flux는 helm이 아직 개발단계이지만 잘 동작했습니다. flux로 helm차트를 릴리즈하면, helm ls결과에서 flux로 배포한 릴리즈가 조회됩니다. 반면, argocd는 helm ls에서 릴리즈가 조회되지 않습니다.
flux만 가능한 기능은 테라폼 코드를 실행하는 기능입니다.
kustomize를 제외하고는 argocd가 flux에 비해 많은 기능을 지원합니다. flux는 멀티 클러스터 배포가 어렵고 권한관리, SSO연동을 지원하지 않습니다.
flux의 미흡한 기능을 제외하고 단점은, helm 또는 kustomize를 무조건 사용해야 합니다. 두 유형을 사용하지 않은 경우, kustomize가 디폴트로 사용됩니다.
아래 표는 flux 와 argocd기능 비교입니다.
| 항목 | Flux | Argocd |
| UI 제공 | O (무료버전, 유료버전 존재) |
O |
| CLI 제공 | O | O |
| 알림 기능 | O | O |
| kustomize 연동 | O | O (kusotmize 옵션 커스터마이징 필요) |
| helm 연동 | O (개발단계) |
O (Helm CLI 미연동) |
| 배포전략 (blue/green, canary) |
O (Flagger 오픈소스 사용) |
O (Argo Rollout 오픈소스 사용) |
| Prune | O | O |
| Manual Sync | O | O |
| Auto Sync | O | O |
| SSO 연동 | X | O |
| 계정/권한 관리 | X | O |
| 메트릭 제공 | O | O |
| 테라폼 코드실행 | O | X |
| Image Updater | O | O |
flux 컨셉
flux는 쿠버네티스 operator패턴을 사용합니다. 사용자가 쿠버네티스에 배포할 내용을 flux CRD로 정의하면, flux controller가 CRD를 읽어 리소스를 쿠버네티스에 배포합니다.

핵심 CRD는 소스(source)와 애플리케이션(application)입니다. 소스는 git, helm registry 등 manifest 주소를 설정합니다. 애플리케이션은 helm 또는 kustomize를 사용하여 manifest를 쿠버네티스에 배포합니다.
flux 설치
flux설치는 flux CLI bootstrap명령어로 쿠버네티스 리소스를 생성합니다. 설치된 리소스는 git에 push가 필요하여 git주소와 git인증정보가 필요합니다. 최초 설치 이후 flux는 자기 자신을 gitops로 설정을 동기화합니다.

github토큰을 발급한 후, 아래 명령어를 입력하여 flux를 설치합니다.
flux bootstrap github \
  --owner=$GITHUB_USER \
  --repository=fleet-infra \
  --branch=main \
  --path=./clusters/my-cluster \
  --personal
flux가 설치되면 flux-system namespace에 쿠버네티스 리소스가 생성됩니다.
kubectl get pods -n flux-system
github에 fleet-infra라는 이름으로 private 저장소가 생성됩니다. my-cluster폴더 경로에 설치된 flux manifest가 있습니다.

hello world(kustomize)
helloworld예제는 github에 있는 nginx manifest를 쿠버네티스에 배포합니다. 배포할 때 kusotmize를 사용합니다.
소스 생성
소스는 flux애플리케이션이 참조하는 소스정보입니다. 소스유형은 git, helm, oci, bucket이 있습니다. 소스생성은 flux create source명령어를 사용합니다.
flux create source {소스 유형}
아래 예제는 제가 미리 준비한 github repo를 이용하여 git 소스를 생성합니다.
GITURL="https://github.com/sungwook-practice/fluxcd-test.git"
flux create source git nginx-example1 \
--url=$GITURL \
--branch=main \
--interval=30s
생성된 소스는 flux get 또는 kubectl crd로 조회가능합니다. kubectl crd로 조회하면 소스주소를 확인할 수 있습니다.
flux get sources git
kubectl -n flux-system get gitrepositories

flux 애플리케이션 생성
flux 애플리케이션은 flux가 배포할 리소스 정의입니다. 애플리케이션이 생성되면, flux는 source에 있는 manifest를 쿠버네티스로 배포합니다.
애플리케이션은 flux create명령어로 생성합니다. 타입이 생소한 용어입니다. 타입은 kustomize또는 helm유형으로 배포할지 설정하는 필수 값입니다. 만약, 두 타입이 아닌 일반 manifest를 배포하고 싶다면 kustomize타입을 사용하세요. flux는 kustomize파일이 없는 경우, kustomize controlle가 kustomize를 자동으로 생성하여 manifest를 배포합니다.
참고자료: https://fluxcd.io/flux/faq/#can-i-use-repositories-with-plain-yamls
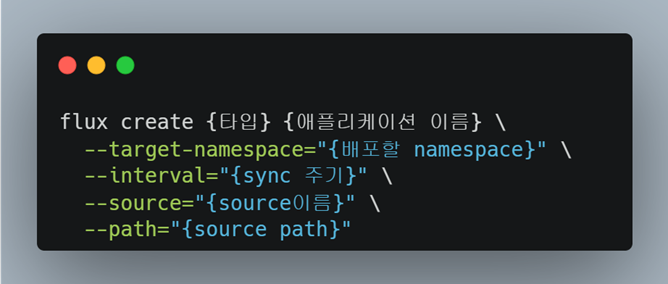
아래 예제는 이전에 생성한 nginx-example1 git source를 사용하여, flxu 애플리케이션을 생성합니다. 배포할 manifest는 nginx 디렉터리에 있는 manifest입니다.
flux create kustomization nginx-example1 \
  --target-namespace=default \
  --interval=1m \
  --source=nginx-example1 \
  --path="./nginx" \
  --health-check-timeout=2m
flux 애플리케이션을 생성하면, git source에 있는 nginx pod와 service가 쿠버네티스에 배포됩니다. git source에 kustomize설정파일이 없으므로, 배포과정에서 kustomize를 생성합니다.
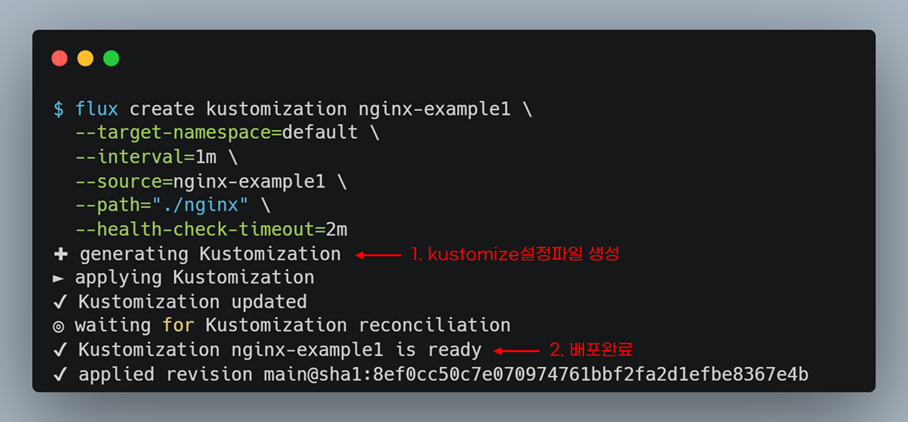
default namespace에 pod와 service가 생성되었는지 확인해보세요.
kubectl -n default get po,svc
flux 애플리케이션은 flux get kustomizations으로 조회할 수 있습니다.
flux get kustomizations
또는 kubectl crd로도 애플리케이션을 조회할 수 있습니다.
kubectl -n flux-system get kustomizations
자동 sync확인
git source에 있는 컨테이너 이미지태그를수정하면, flux 애플리케이션이 자동으로 업데이트되는지 확인합니다.
이전에 생성한 flux 애플리케이션은 git source가 수정되었는지 1분마다 검사합니다. 애플리케이션을 생성할 때 interval필드를 1분으로 설정했기 때문입니다.
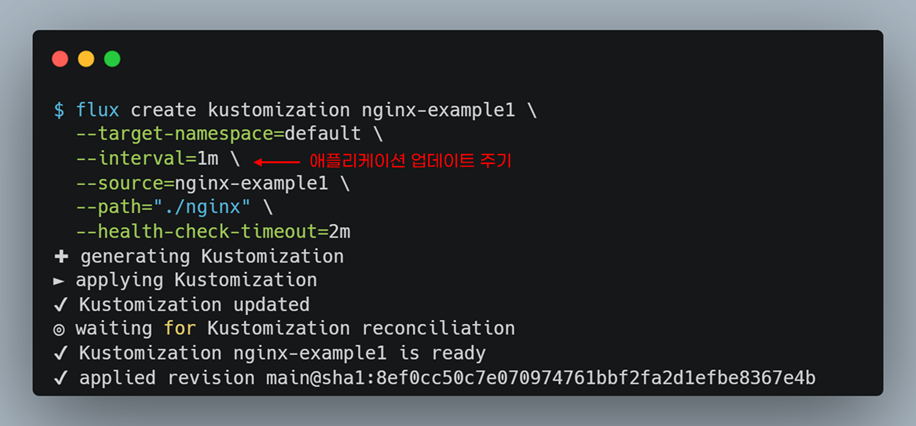
저는 이미지 태그 1.25로 수정하고 git push 했습니다.

flux 애플리케이션 로그를 실시간 모니터링 하면, flux가 nginx-example1 애플리케이션이 업데이트하는 과정을 볼 수 있습니다.
flux -n default get kustomizations --watch
nginx pod 이미지 태그를 확인한 결과, git에 push한 이미지 태그와 동일했습니다.
kubectl -n default describe po nginx-example1 | grep "Image:"
애플리케이션 삭제
애플리케이션 삭제는 flux delete명령어를 사용합니다.
flux -n {namespace} delete {타입} {애플리케이션 이름}
아래 예제는 이전에 생성한 애플리케이션을 삭제했습니다.
flux -n default delete kustomization nginx-example1
flux 애플리케이션이 삭제되었지만 여전히 nginx pod와 service가 있습니다.

그 이유는 애플리케이션 생성시 prune옵션을 false(default)로 했기 때문입니다.

prune을 활성화하여 flux 애플리케이션을 다시 생성하고, 애플리케이션을 삭제해보세요. 쿠버네티스 리소스가 삭제되었습니다.
flux create kustomization nginx-example1 \
  --target-namespace=default \
  --prune=true \
  --interval=1m \
  --source=nginx-example1 \
  --path="./nginx" \
  --health-check-timeout=2m
flux delete kustomization nginx-example1kubectl -n default get po,svc
소스삭제
애플리케이션을 삭제했으니 사용하지 않는 소스를 삭제합니다.
flux -n {namespace} delete source {소스 타입} {소스 이름}
이전에 만든 소스를 삭제했습니다.
flux -n default delete source git nginx-example1
helm차트 배포
flux는 helm차트를 배포하기 위해 helm source와 helm application을 사용합니다.
※ flux helm 차트 배포는 23.6.1기준으로 정식 릴리즈 되지 않고 개발중입니다.
helm 소스 생성
먼저, helm 소스를 생성합니다. helm차트는 helm공식 예제 차트를 사용했습니다.
※ 링크: https://github.com/helm/examples/tree/main
flux create source helm helm-source-example \
  --url https://helm.github.io/examples \
  --namespace default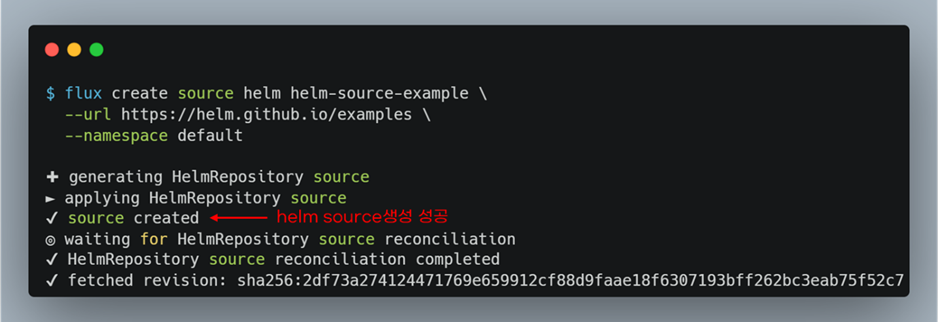
생성한 helm 소스는 HelmRepository CRD로 관리됩니다. CRD namespace는 helm 소스를 생성할 때 지정한 namespace입니다.
kubectl -n {namespace} get HelmRepository
flux CLI에서는 get source helm명령어로 helm 소스를 조회합니다.
flux -n {namespace} get source helm
helm 애플리케이션 생성
helm 애플리케이션은 helmrelease타입으로 생성합니다. chart인자는 helm chart이름, source는 helm 소스를 지정합니다. 그리고 namespace는 helm 소스가 있는 namespace를 설정합니다.
flux create helmrelease helm-application-example \
  --chart hello-world \
  --source HelmRepository/helm-source-example \
  --chart-version "0.1.0" \
  --namespace default
helm 애플리케이션은 HelmRelease CRD로 관리됩니다. namespace는 helm 애플리케이션 생성 시 지정한 namespace입니다.
kubectl -n {namespace} get HelmRelease
flux CLI에서는 flux get helmrelease로 helm애플리케이션을 조회합니다.
flux -n {namespace} get helmrelease
helm CLI로도 helm 애플리케이션을 조회할 수 있습니다.
helm -n {namespace} ls
helm values오버라이딩과 helm upgrade
helm values 오버라이딩은 2가지 방법으로 할 수 있습니다. 로컬pc에 있는 values.yaml파일을 사용하거나 쿠버네티스 configmap 또는 secret리소스를 사용합니다. helm upgrade는 helm 애플리케이션 생성 명령어와 동일합니다.
로컬pc values.yaml 예제
로컬 pc에 있는 values.yaml을 사용하려면 --values인자에 values.yaml파일 경로를 입력합니다.
flux create helmrelease helm-application-example \
  --chart hello-world \
  --source HelmRepository/helm-source-example \
  --chart-version "0.1.0" \
  --namespace default \
  --values {values.yaml 경로}
예제로 deployment replica를 2로 오버라이딩해보겠습니다. dev-values.yaml파일을 생성합니다.
cat <<EOF > dev-values.yaml
replicaCount: 2
EOF
values.yaml을 사용하여 helm 애플리케이션을 업그레이드합니다. 업그레이드는 helm 애플리케이션 생성 명령어와 동일합니다.
flux create helmrelease helm-application-example \
  --chart hello-world \
  --source HelmRepository/helm-source-example \
  --chart-version "0.1.0" \
  --namespace default \
  --values values.yaml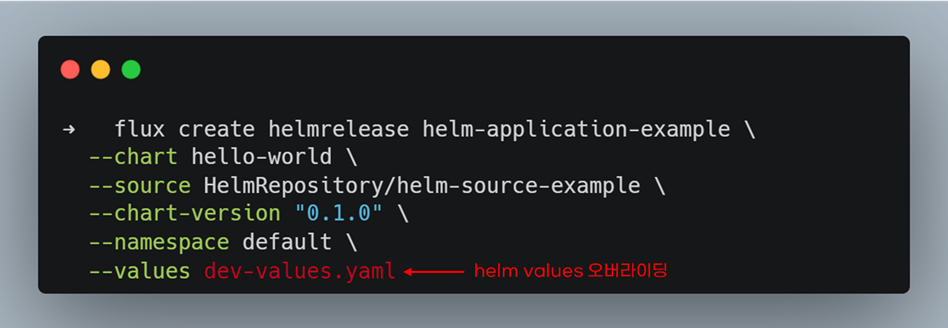
helm 릴리즈 revision은 helm CLI 또는 kubectl CRD조회로 확인가능합니다. helm 릴리즈가 업그레이드되었으므로 REVISION이 2이상 값을 가집니다.
helm -n default ls
CRD로 조회했을 때도 REVSION이 증가했습니다.
kubectl -n default describe helmrelease helm-application-example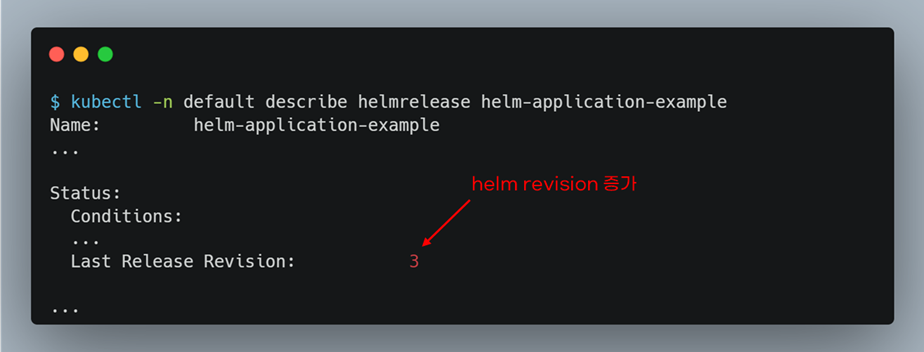
configmap 예제
flux create helmrelease helm-application-example \
  --chart hello-world \
  --source HelmRepository/helm-source-example \
  --chart-version "0.1.0" \
  --namespace default \
  --values-from={resource kind}/{resource 이름}
예제로 configmap으로 values.yaml을 설정해보겠습니다. helm values.yaml가 있는 configmap을 생성합니다.
cat <<EOF | kubectl apply -f -
kind: ConfigMap
apiVersion: v1
metadata:
  name: override-value
  namespace: default
data:
  values.yaml: |-
    replicaCount: 3
EOF
예제로 configmap으로 values.yaml을 설정해보겠습니다. helm values.yaml가 있는 configmap을 생성합니다.
cat <<EOF | kubectl apply -f -
kind: ConfigMap
apiVersion: v1
metadata:
  name: override-value
  namespace: default
data:
  values.yaml: |-
    replicaCount: 3
EOF
helm 릴리즈를 업그레이드합니다. 업그레이드는 helm 애플리케이션 생성 명령어와 동일합니다.
flux create helmrelease helm-application-example \
  --chart hello-world \
  --source HelmRepository/helm-source-example \
  --chart-version "0.1.0" \
  --namespace default \
  --values-from=Configmap/override-value
helm 릴리즈 REVISION이 증가했는지 확인합니다.
kubectl -n default describe helmrelease helm-application-example
pod가 3개인지 확인합니다. helm values.yaml으로 deployment replica를 3개로 설정했으므로, pod개수가 3개여야 합니다.
kubectl -n default get po
helm 애플리케이션 삭제
helm 애플리케이션 삭제는 flux delete명령어를 사용합니다.
flux -n {namespace} delete helmrelease {애플리케이션 이름}
아래 예제는 이전에 생성한 애플리케이션을 삭제했습니다.
flux -n default delete helmrelease helm-application-example
helm 소스 삭제
helm 애플리케이션을 삭제했으니 사용하지 않는 helm 소스를 삭제합니다.
flux -n {namespace} delete source helm {소스 이름}
이전에 생성한 helm 소스를 삭제했습니다.
flux -n defualt delete source helm helm-source-example
flux 삭제
flux CLI로 flux를 삭제합니다. default namespace를 제외하고 flux로 생성한 namespace는 삭제됩니다.
flux uninstall --namespace=flux-system
알림
알림은 git 소스코드 변동, flux 애플리케이션 배포결과 등 flux 이벤트를 알림으로 전송하는 기능입니다. 이 예제에서는 git push 이벤트와 flux 애플리케이션이 배포 이벤트를 slack에 전송합니다.

동작원리
동작원리는 notification controller가 알림설정에 일치하는 이벤트가 발생하면 slack에게 알림을 전송합니다.
알림 설정은 provider CRD와 alert CRD를 사용합니다. provider CRD는 어떤 공급자에게 알림을 보낼 것인가를 설정합니다. alert CRD는 알림을 보낼 이벤트를 등록합니다.

사전조건
slack채널을 생성하고 slack webhook url을 설정해야 합니다.

notification controller실행 확인
알림을 사용하기 위해 notification-controller이 실행 중이여야 합니다. flux bootstrap설치 시 디폴트 설정을 사용했더라면, notification-controller가 설치되어 있습니다.
kubectl -n flux-system get po
slack 연결 설정
slack연결은 provider CRD로 설정합니다. provider CRD에 slack 채널과 webhook주소를 설정합니다.
webhook주소는 secret으로 생성합니다.
SLACK_WEBHOOK_URL="your slack webhook url"
kubectl -n flux-system create secret generic slack-url \
--from-literal=address=$SLACK_WEBHOOK_URL
provider를 생성합니다. secretRef는 이전에 만든 webhook주소입니다.
SLACK_CHANNEL="alarm-test"
cat <<EOF | kubectl apply -f -
apiVersion: notification.toolkit.fluxcd.io/v1beta2
kind: Provider
metadata:
  name: slack
  namespace: flux-system
spec:
  type: slack
  channel: $SLACK_CHANNEL
  secretRef:
    name: slack-url
EOF
생성한 provider는 get provider로 조회할 수 있습니다.
kubectl -n flux-system get provider
이벤트 알림 등록
이벤트 알림 등록은 alert CRD로 설정합니다. 이 예제에서는 모든 git 소스코드 이벤트와 kustomize이벤트를 알림으로 등록합니다.
cat << EOF | kubectl apply -f -
apiVersion: notification.toolkit.fluxcd.io/v1beta2
kind: Alert
metadata:
  name: on-call-webapp
  namespace: flux-system
spec:
  summary: "hello world"
  providerRef:
    name: slack
  eventSeverity: info
  eventSources:
    - kind: GitRepository
      name: '*'
    - kind: Kustomization
      name: '*'
EOF
등록한 이벤트 알림은 get alert로 조회가능합니다.
kubectl -n flux-system get alert
알림 테스트
hello world챕터에서 실습했던 예제를 재사용하여 알림을 테스트합니다.
먼저 git 소스를 생성합니다.
GITURL="https://github.com/sungwook-practice/fluxcd-test.git"
flux create source git nginx-example1 \
--url=$GITURL \
--branch=main \
--interval=30s
그 다음 git 소스에서 이미지 태그를 수정한 후, git commit&push를 진행합니다.
git add .
git commit "nginx  image tag 변경"
git push
약 몇 초 후에, 슬랙에 git 소스코드가 변경되었다는 알림메세지가 전송됩니다.

이제 flux application을 생성해봅시다.
flux create kustomization nginx-example1 \
  --target-namespace=default \
  --interval=1m \
  --source=nginx-example1 \
  --path="./nginx" \
  --health-check-timeout=2m
flux application을 생성한 후, 몇 초 뒤에 슬랙에 알림메세지가 전송됩니다.

대시보드 설치
flux대시보드는 자체 기능으로 제공하지 않고 weave gitops도구로 설치합니다. weave gitops도구는 flux를 활용하여 추가 기능을 만든 도구로서, 유료/무료버전이 있습니다. 2023.6월 기준으로 리눅스, 맥에서 gitops를 설치할 수 있습니다.
설치
먼저 gitops 도구를 설치합니다.
curl --silent --location "https://github.com/weaveworks/weave-gitops/releases/download/v0.24.0/gitops-$(uname)-$(uname -m).tar.gz" | tar xz -C /tmp
sudo mv /tmp/gitops /usr/local/bin
gitops version
flux대시보드는 flux helm 애플리케이션으로 배포됩니다. 비밀번호는 대시보드 로그인 비밀번호입니다.
PASSWORD="password"
gitops create dashboard ww-gitops \
  --password=$PASSWORD
대시보드가 정상적으로 생성되면 helmrelease가 생성됩니다.
flux -n flux-system get helmrelease
아래그림처럼 pod가 Running상태여야 합니다.
kubectl -n flux-system get pod
접속
대시보드 쿠버네티스 서비스를 port-forward합니다.
kubectl port-forward svc/ww-gitops-weave-gitops -n flux-system 9001:9001
웹 브라우저를 열고 127.0.0.1:9001에 접속합니다. 로그인 창이 나오면 대시보드 생성시 설정한 비밀번호를 입력합니다.

로그인을 성공하면 flux 소스, flux 애플리케이션 등을 조회하는 화면이 보입니다.

마치며
시간이 많이 없어서.. 아쉽게도 빌드/배포 파이프라인, Image updater, Flagger(배포전략), 메트릭 대시보드, 민감정보 암호화는 하지 못했습니다. 특히 Image updater를 해보고 싶었는데 많이 아쉽습니다.
공식 예제는 flux CRD를 전부 git에 push하는 방법으로 되어 있었습니다. 하지만, 처음 따라할 때 git push방식은 따라하기 어렵다고 생각하여 flux CLI로만 사용하도록 글을 작성했습니다.
flux가 v2로 업데이트되면서 매 분기마다 많은 내용이 업데이트 되고 있습니다. 특히 테라폼 지원을 넣은 것이 신기했는데요. 온프레미스 terraform cloud를 대체하려는 목적인지 의문이 들었습니다.
개인적으로는 아직까지는 argocd가 사용에 편리한 것 같습니다. 대시보드와 sso 연동, 멀티 클러스터, 권한관리때문입니다. 특히 멀티 클러스터와 권한관리가 운영에 매우 중요한 체크포인트인데 아직 flux는 기능이 없는 것 같습니다.
참고자료
- flux 공식문서: https://fluxcd.io/flux/
- weave gitops: https://docs.gitops.weave.works/docs/installation/weave-gitops/#next-steps
'연재 시리즈' 카테고리의 다른 글
| 테라폼으로 EKS만들기 프로젝트 2편 - 테라폼과 코드에디터 설치 (0) | 2023.06.18 |
|---|---|
| 테라폼으로 EKS만들기 프로젝트 1편 - 개요 (2) | 2023.06.18 |
| EKS 스터디 - 6주차 2편 - EKS pod가 IMDS API를 악용하는 시나리오 (2) | 2023.05.28 |
| EKS 스터디 - 6주차 1편 - 미흡한 kubelet 인증/인가 설정의 위험 (0) | 2023.05.27 |
| EKS 스터디 - 5주차 2편 - CPA (0) | 2023.05.21 |