목차
- 서비스 메시는 무엇일까?: https://malwareanalysis.tistory.com/280
- Istio아키텍처: https://malwareanalysis.tistory.com/304
- envoy proxy 체험: https://malwareanalysis.tistory.com/305
- Istio envoy 동적설정 원리: https://malwareanalysis.tistory.com/306
- istio설치: https://malwareanalysis.tistory.com/297
- istio-operator: https://malwareanalysis.tistory.com/298
- istion injecton: https://malwareanalysis.tistory.com/299
- Istio트래픽 흐름과 설정 이해: https://malwareanalysis.tistory.com/307
- istio keycloak 인증 연동: https://malwareanalysis.tistory.com/310
1. 트래픽 흐름
istio가 관리하는 서비스 메시영역은 ingress gateway로 접근이 가능합니다. ingress gateway를 거치지 않으면 일반 쿠버네티스 통신을 따릅니다. ingress gateway는 sidecar로 설치된 istio-proxy(envoy)로 트래픽을 전달합니다. pod에 쿠버네티스 service가 설정되어 있으면, service가 가리키는 endpoints pod정보를 조회합니다. 그리고 서비스를 거치지 않고 다이렉트로 pod로 트래픽을 전달합니다.

2. Ingress gateway
2.1 정의
Ingress gateway는 istio가 관리하는 서비스 메시로 들어오는 관문(gateway)역할을 합니다. 쿠버네티스 CRD로 설정되어 있습니다. gateway의 동작은 proxy에게 위임하는데, 보통 istio-sytsem namespace에 설치된 envoy-proxy를 사용합니다.
envoy proxy 전 게시글(https://malwareanalysis.tistory.com/305)에서 살펴봤듯이, listeners필드 설정값에 따라 트래픽이 라우팅됩니다. 그러므로, envoy proxy에 간단한 이해가 필요합니다.
2.2 설정
github 링크: https://github.com/choisungwook/istio-example/blob/main/concepts/istio-components.yaml

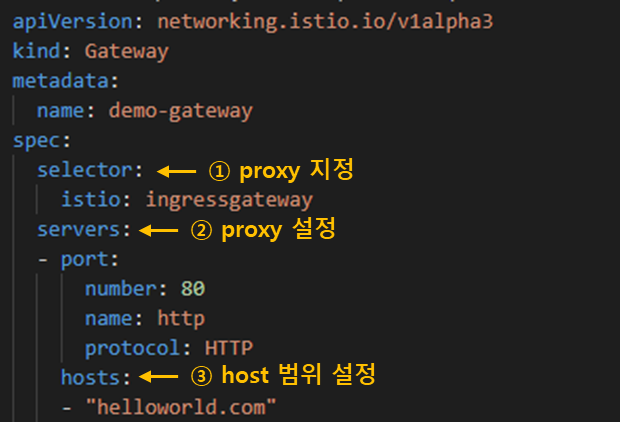
① selector는 gateway동작을 담당하게 될 proxy를 설정합니다. nginx, envoy등 proxy를 설정할 수 있습니다. 보통 envoy proxy를 사용합니다. ingress gateway는 1개 이상 존재해야 합니다.
예제에서는 "istio: ingressgateway" 라벨을 사용하는 envory proxy에게 ingress gateway역할을 위임합니다.
kubectl get po -n istio-system -l istio=ingressgateway
② proxy로 접근 주소와 프로토콜을 설정합니다.
③ proxy가 관리하는 주소를 설정합니다.
2.3 실습
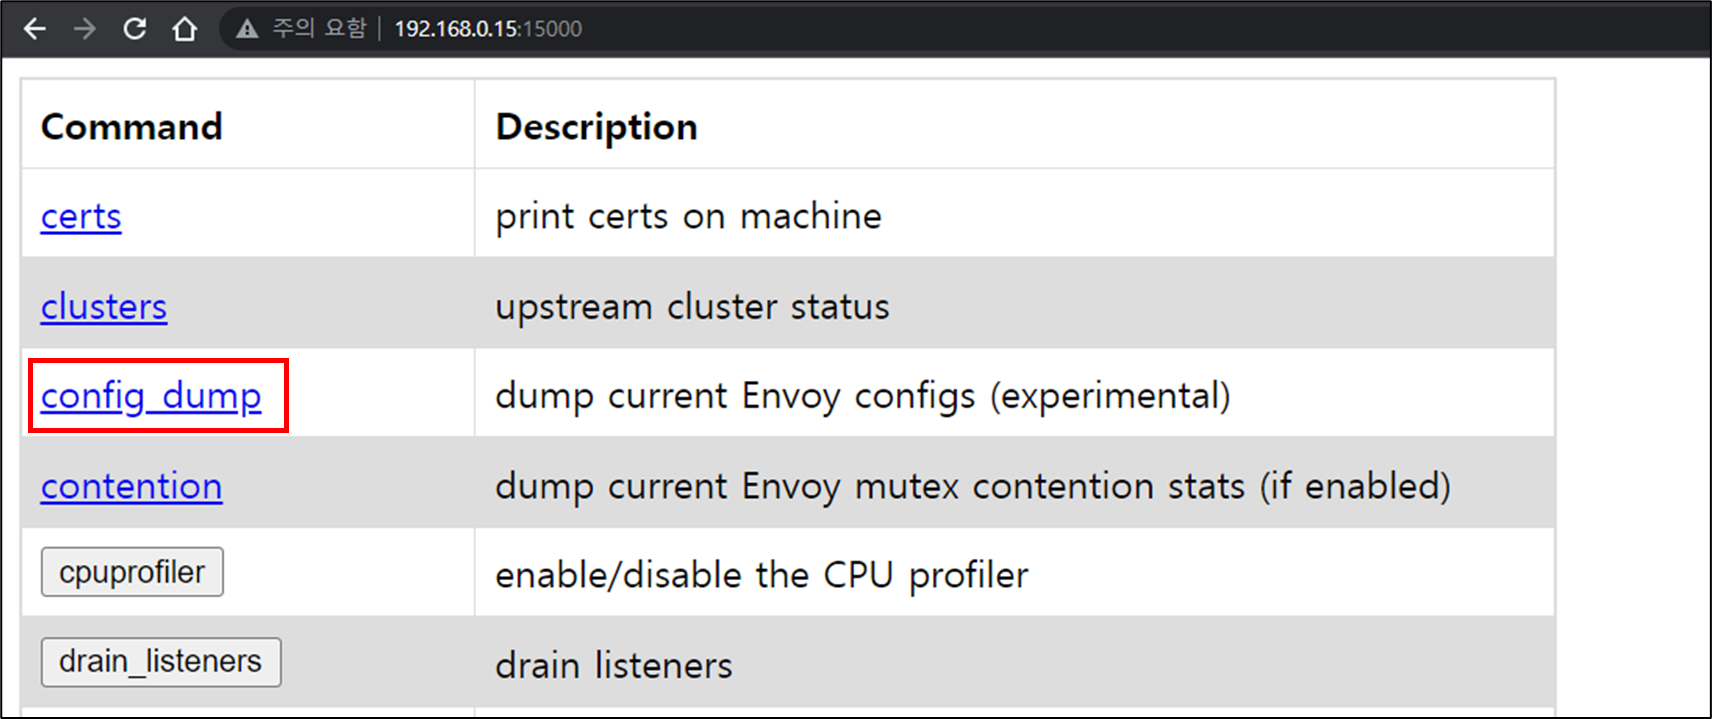
ingress gateway를 설정하기 이전에 기존 envoy설정을 살펴보겠습니다. ingress gateway pod의 15000포트를 포워딩합니다.
kubectl -n istio-system port-forward --address=0.0.0.0 pod/istio-ingressgateway-6cf578d4c8-g8v6x 15000:15000
웹브라우저로 접속하면 아래와 같은 화면이 나옵니다. 설정을 보기 위해 config_dump를 클릭합니다.

dynamic_route_configs필드가 동적으로 설정되는 값입니다. 지금은 envoy proxy로 접근하기 위해 virtual_hosts가 설정되어 있습니다.

아래 gateway설정을 배포합니다.
apiVersion: networking.istio.io/v1alpha3
kind: Gateway
metadata:
  name: demo-gateway
spec:
  selector:
    istio: ingressgateway
  servers:
  - port:
      number: 80
      name: http
      protocol: HTTP
    hosts:
    - "helloworld.com"
envoy 설정에서 helloworld.com을 검색하면, 아직 보이지 않습니다. 아직까지는 ingress gateway역할하는 프록시에 설정이 되지 않습니다. 다음 단계인 virtualhost를 설정해야 proxy에 설정이 반영됩니다.
3. virtualservice
3.1 정의
virtualservice는 ingress gateway의 라우팅 설정을 담당합니다. 즉, ingress gateway 역할을 하는 proxy설정을 정의합니다.
3.2 설정
github링크: https://github.com/choisungwook/istio-example/blob/main/concepts/istio-components.yaml#L16
최소 설정은 ingress gateway이름, host범위, 라우팅 설정입니다. 이외에 로드밸런싱 비율 등을 설정할 수 있습니다.

3.3 실습
gateway와 virtualhost를 배포합니다.
apiVersion: networking.istio.io/v1alpha3
kind: Gateway
metadata:
  name: demo-gateway
spec:
  selector:
    istio: ingressgateway
  servers:
  - port:
      number: 80
      name: http
      protocol: HTTP
    hosts:
    - "helloworld.com"
---
apiVersion: networking.istio.io/v1alpha3
kind: VirtualService
metadata:
  name: demo-virtualservice
spec:
  hosts:
  - "helloworld.com"
  gateways:
  - demo-gateway
  http:
  - route:
    - destination:
        host: demo-version
        port:
          number: 80
ingress gateway역할을 하는 envoy proxy를 포트포워딩 합니다.
kubectl -n istio-system port-forward --address=0.0.0.0 pod/istio-ingressgateway-6cf578d4c8-g8v6x 15000:15000
그리고 envoy 설정 페이지로 이동합니다.

dynamic_route_configs필드를 보면 domais과 routes설정이 추가되었습니다. helloworld.com으로 요청이오면 default namespace에 있는 demo-version 쿠버네티스 서비스로 라우팅합니다.

4. 쿠버네티스 pod, service배포
ingress gateway설정이 끝났지만, pod와 service가 배포가 되어 있지 않아서 요청이 실패합니다. 요청을 테스트하기 위해 pod와 service를 배포해봅시다.
github 링크: https://github.com/choisungwook/istio-example/blob/main/concepts/versoin.yaml
4.1 namespace injection설정
default namespace에 istion injection설정을 활성화 합니다.
kubectl label namespace default istio-injection=enabled --overwrite
4.2 pod, service배포
apiVersion: v1
kind: Pod
metadata:
  name: version2
  labels:
    app: demo
    version: v2
spec:
  restartPolicy: Always
  containers:
  - name: version1
    image: choisunguk/istio-pythondemo:v2.1
    resources:
      limits:
        memory: "128Mi"
        cpu: "100m"
    ports:
      - containerPort: 80
---
apiVersion: v1
kind: Pod
metadata:
  name: version1
  labels:
    app: demo
    version: v1
spec:
  restartPolicy: Always
  containers:
  - name: version1
    image: choisunguk/istio-pythondemo:v1.1
    resources:
      limits:
        memory: "128Mi"
        cpu: "100m"
    ports:
      - containerPort: 80
---
apiVersion: v1
kind: Service
metadata:
  name: demo-version
spec:
  selector:
    app: demo
  ports:
  - port: 80
    targetPort: 80
envoy proxy injectino이 잘 되었는지 컨테이너 갯수를 확인합니다.

4.3 ingress gateway 호출
ingress gateway service의 external-ip를 조회합니다.
kubectl -n istio-system get svc,po -l istio=ingressgateway
그리고 hosts파일을 설정합니다.
- 리눅스: /etc/hosts
- 윈도우: c:\Windows\System32\drivers\hosts
helloworld.com을 호출해봅니다. version1, version2 pod가 번걸아가면서 호출됩니다.
curl helloworld.com;echo
'전공영역 공부 기록' 카테고리의 다른 글
| tmux 세션 종료 (0) | 2022.03.27 |
|---|---|
| 리눅스 쉘 스크립트 에러 핸들링과 dockerfile 적용 (0) | 2022.03.27 |
| Istio envoy를 동적으로 설정하는 원리 (0) | 2022.03.26 |
| envoy proxy 체험 (0) | 2022.03.26 |
| Istio 아키텍처 (0) | 2022.03.26 |